Learn step-by-step how you can quickly create a customer journey map using these free tools.
Published in: Journey Mapping / Last update: December 2020
Are you looking to create a customer journey map and don't want to invest in a new tool?
Well, in that case Excel or Google Sheets might just be the tool you're looking for.
This article will show you step-by-step how you can use these tools to create a customer journey map, without going crazy.
You'll also learn how Excel and Google sheets stack up against other journey mapping tools. You might get surprised.
So let's get right into it and start creating our journey map.
The journey we're going to map in this example is that of an over excited dad going for trip to the Zoo with the kids.
You can access the final customer journey map that we're going to create in this article and use it as a template. Just click the image above and make a copy of that journey map in Google sheet.
Creating the map structure
Prepare
In this example we'll be using Google Sheets but most things should just as easily translate to Microsoft Excel.
First thing you need to do is to create a new document. From the start I like to turn off the gridlines so it looks less like a spreadsheet. (View > Gridlines)
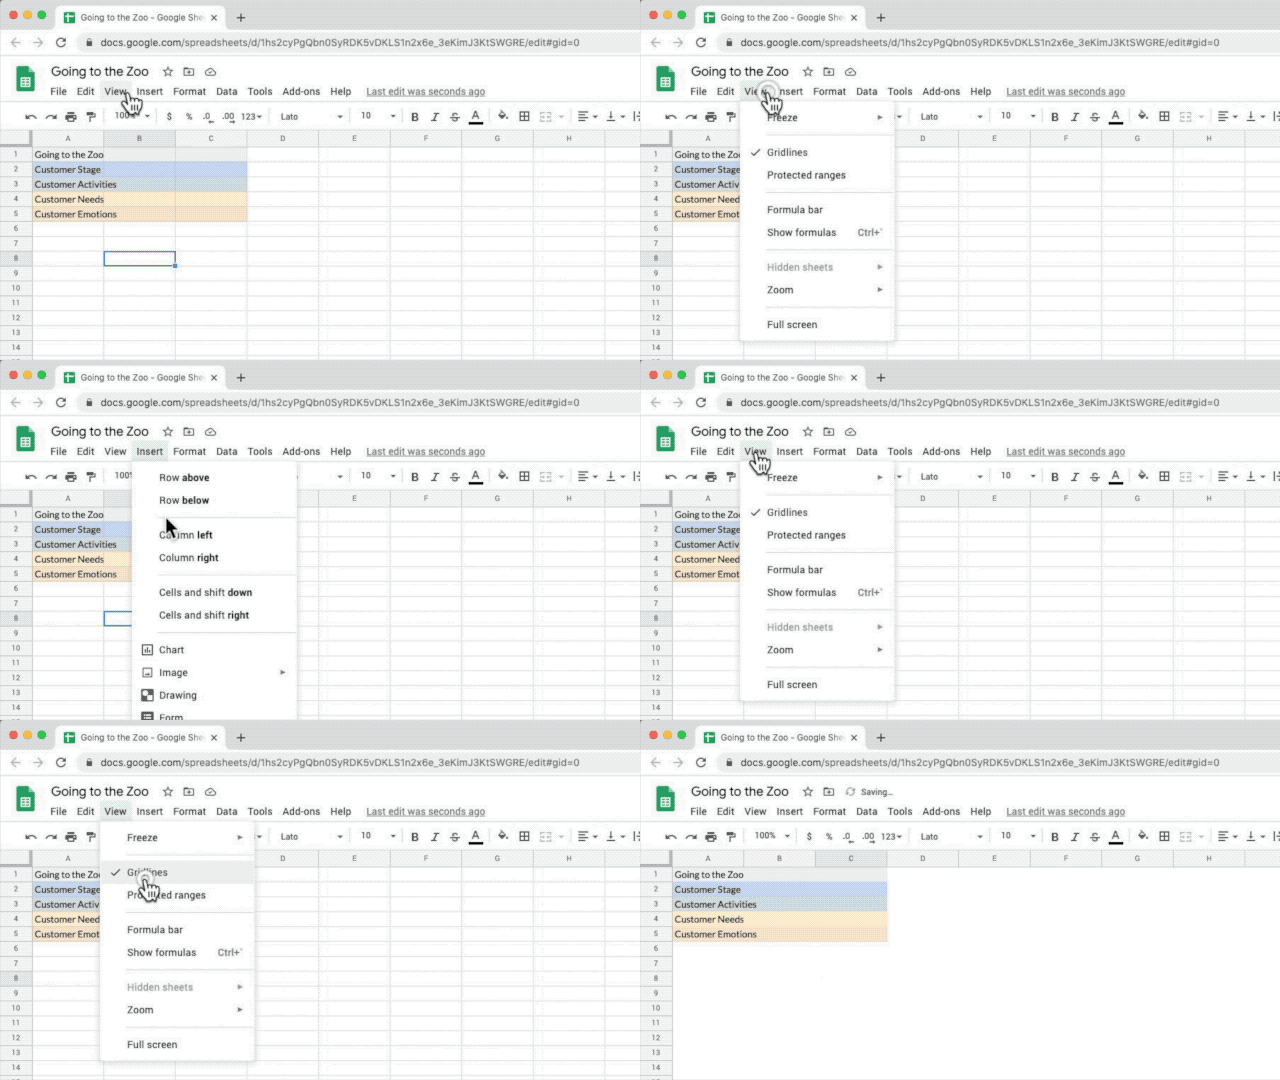
Turn off gridlines to get rid of that spreadsheet feeling
Let's add the title and add the customer segment to the top row so we know what we're working on.
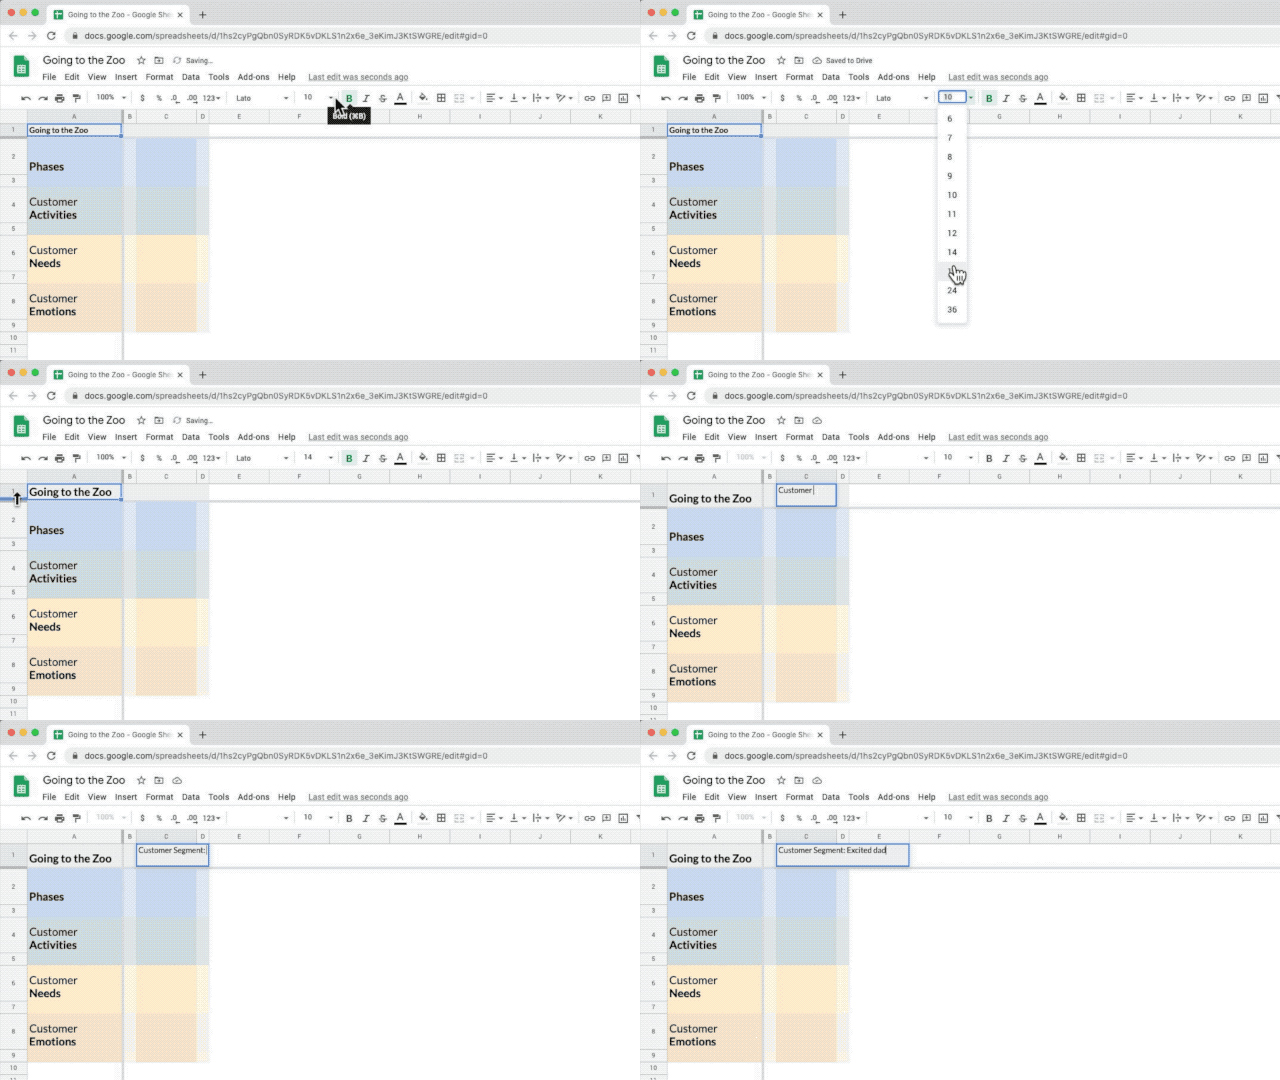
Add a title and describe the customer segment
Step 1: Creating lanes
We're going to create basic structure of our map using 4 lanes: 1) Phases, 2) Customer Activities, 3) Customer Needs and 4) Customer Emotions. Just add those names in the top 4 rows.
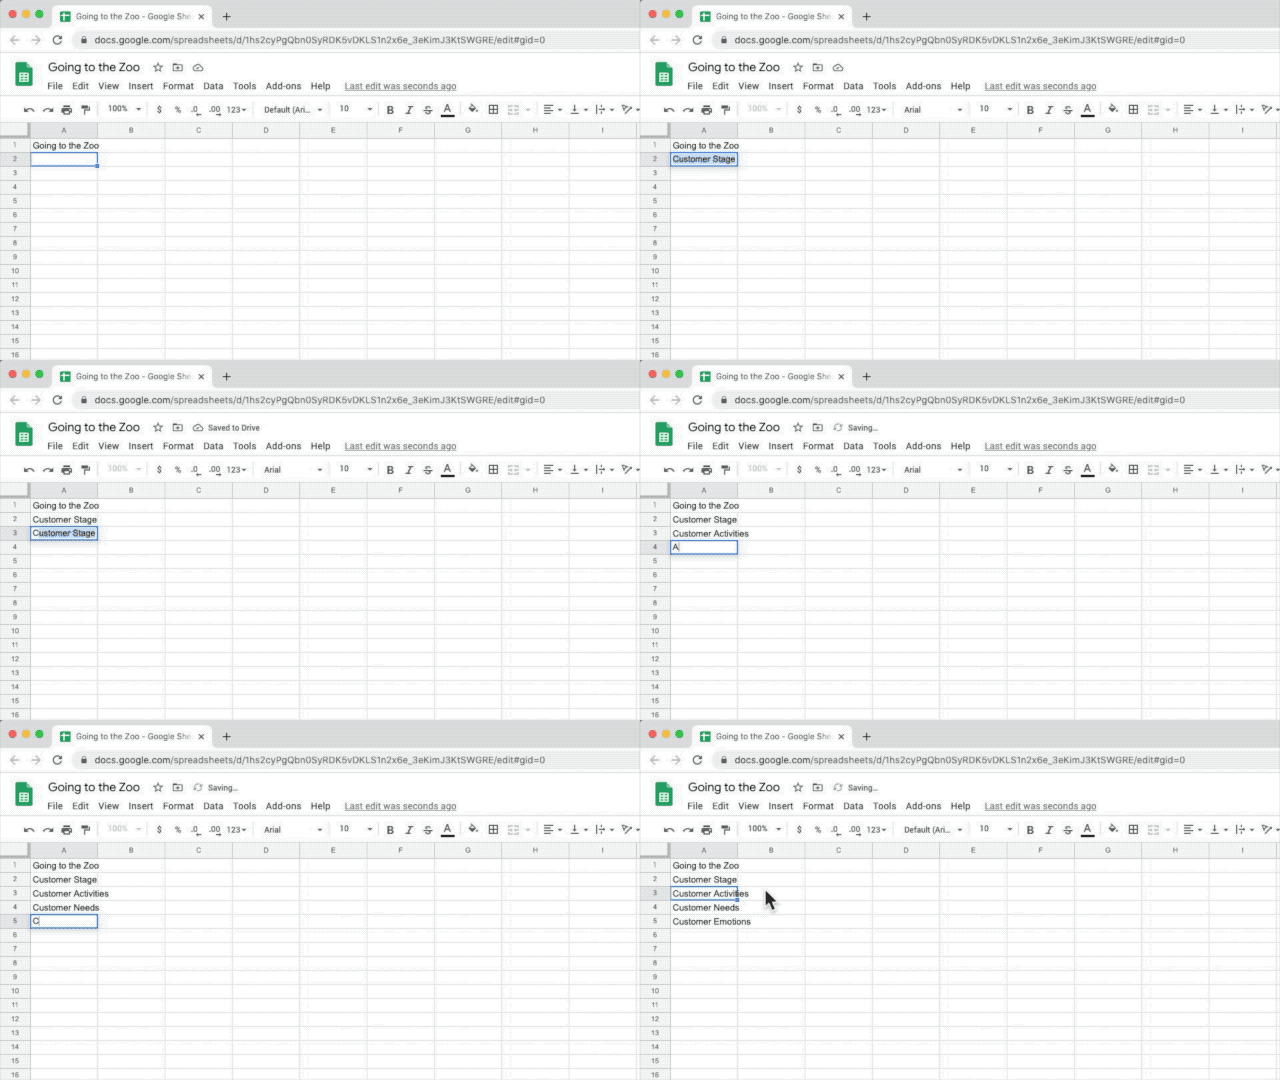
Add the 4 main lanes to your journey map
What you want to do next is change the background color of the lanes.
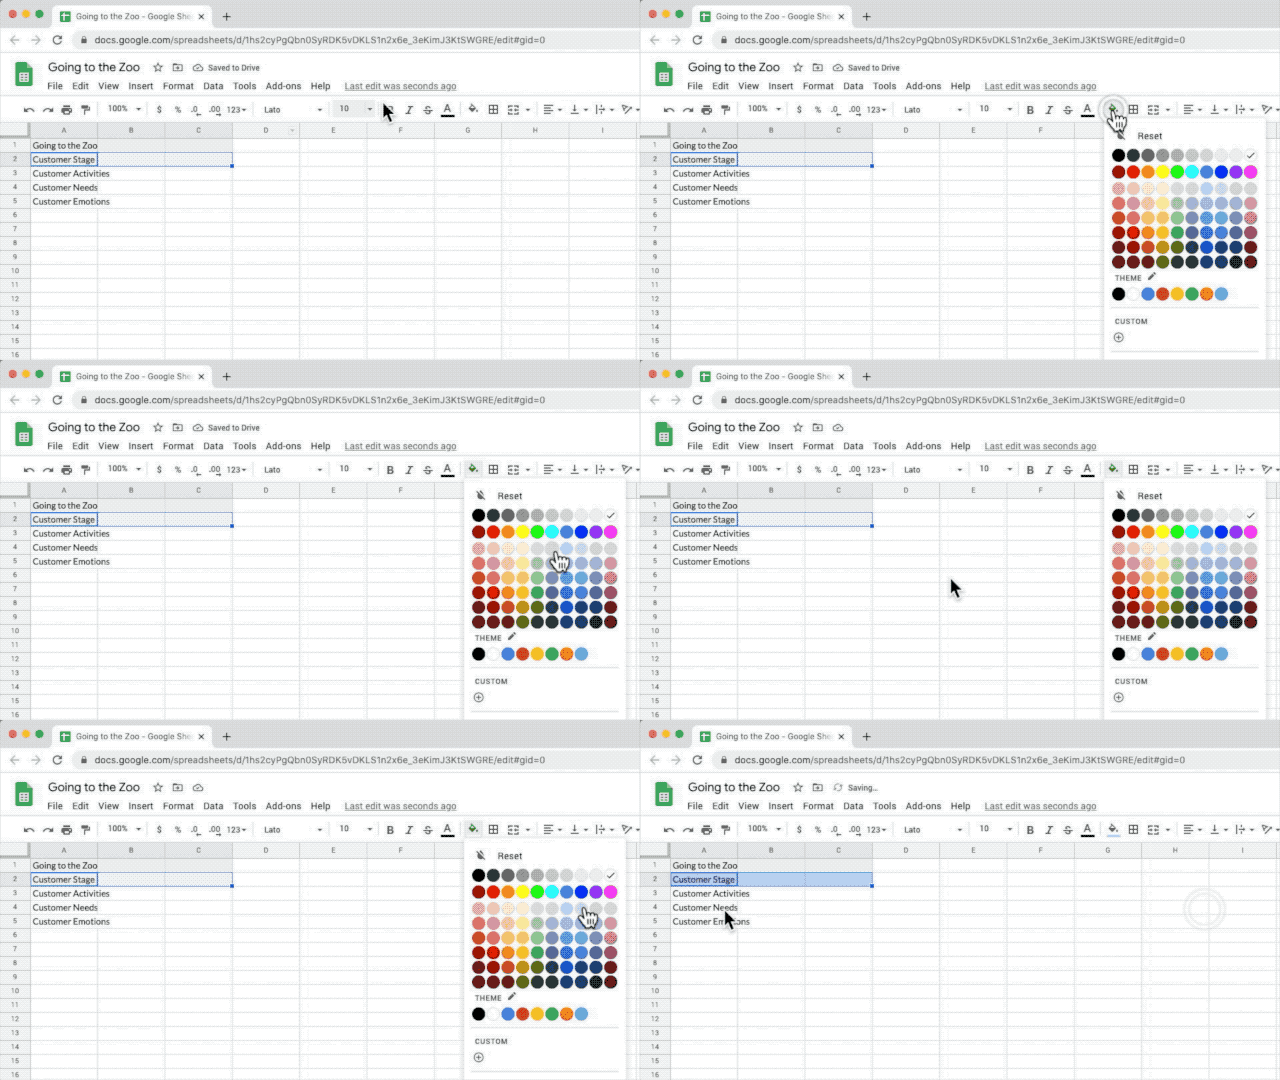
Change the background color of your lanes to make them visually stand out
And let's give them a bit more space for visual clarity.
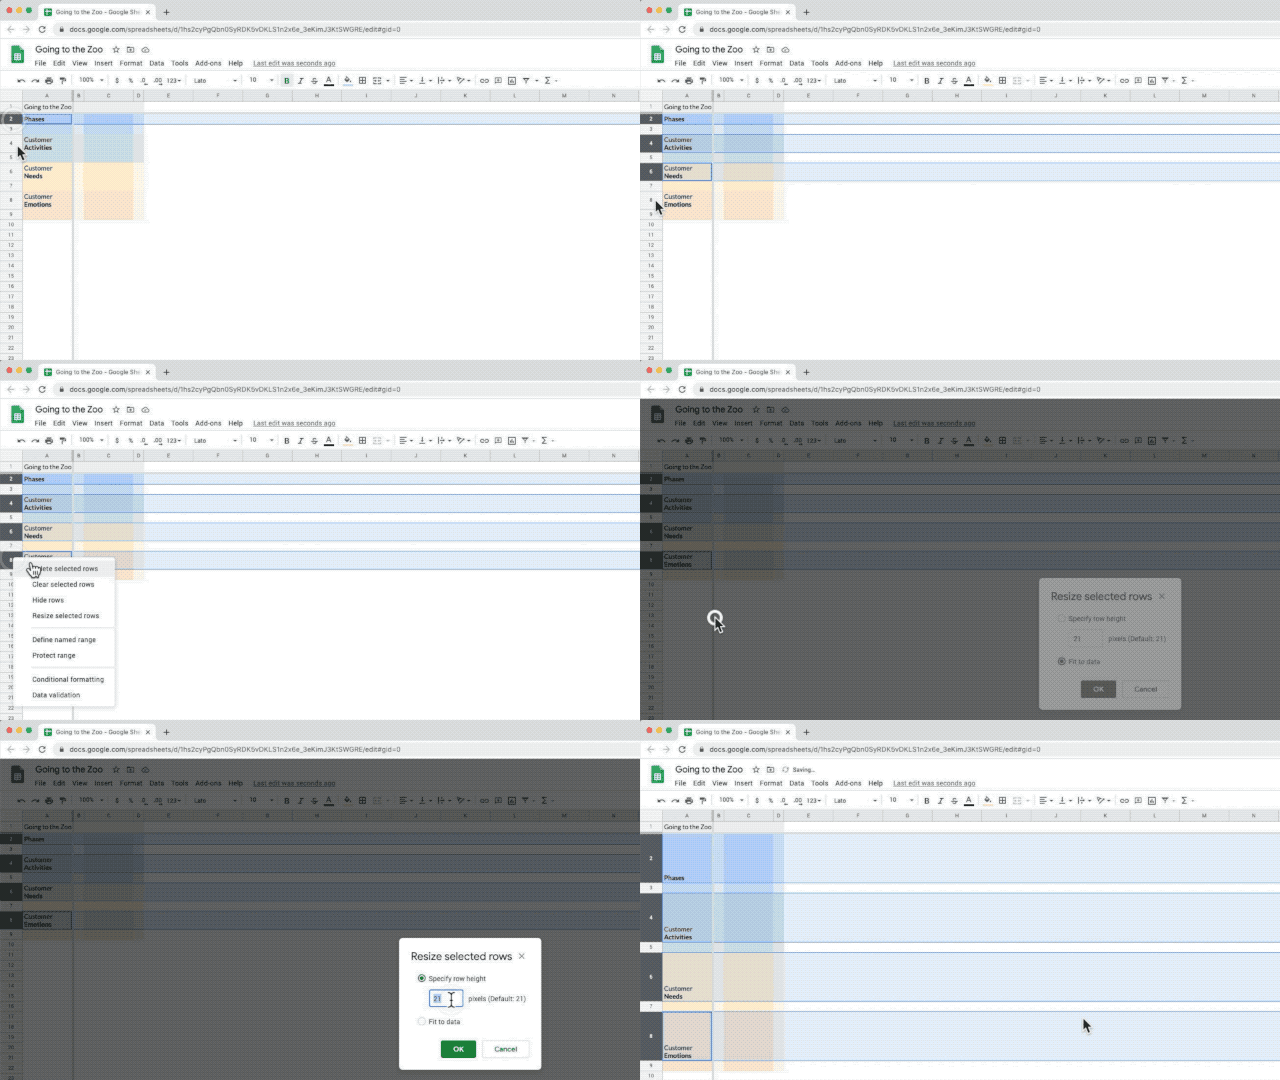
Make your lanes higher to create some space
Finally we're going to add separator lanes which will be very useful later when we need to expand the map.
To add a separator lane just take a column, set the background color to be a bit lighter than the original color and set the size to be about 20.
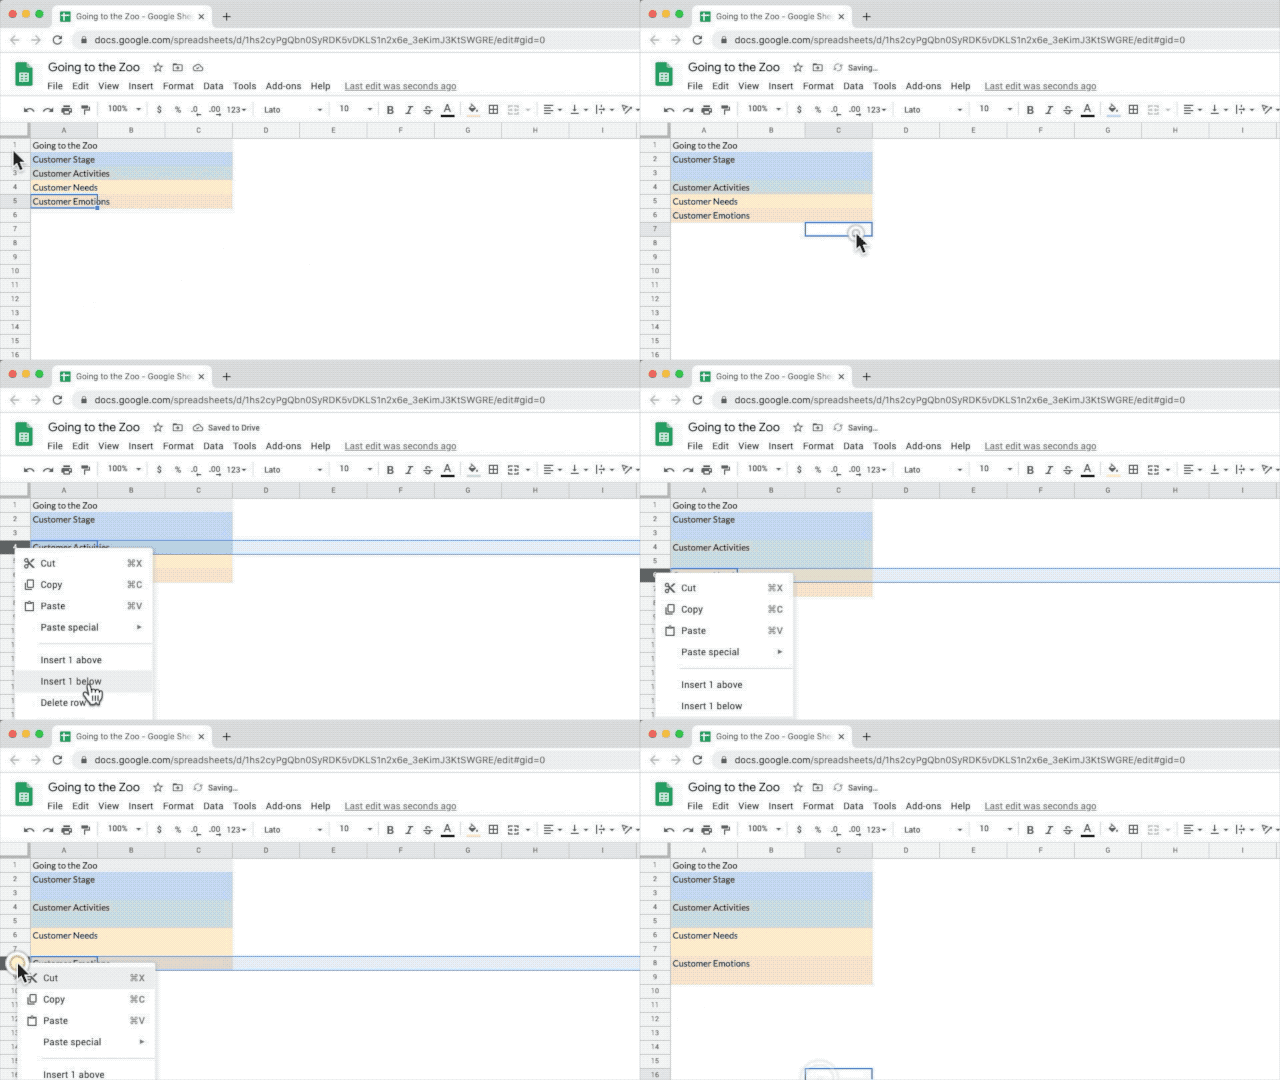
Add separator lanes to make your life easier in the future
You might be tempted to use cell borders as separator lanes but I've found that it gets very messy really fast. Working with stand alone separator lanes is faster and more flexible.
By the way if you need help setting up the basic structure of your journey map check out the customer journey mapping essentials masterclass which explains it all in more detail.
Step 2: Adding details
In a physical setting you'd now start filling your journey map by adding sticky notes to it.
Adding virtual sticky notes to your journey map is really straight forward in Google sheets. You just need to fill in the blank cells with data.

Use cells to add details to your journey map
A really useful feature is that you can format the text inside a cell. So you can make words bold or color them red to add emphasis. You can change the font size of words and even turn them into links.
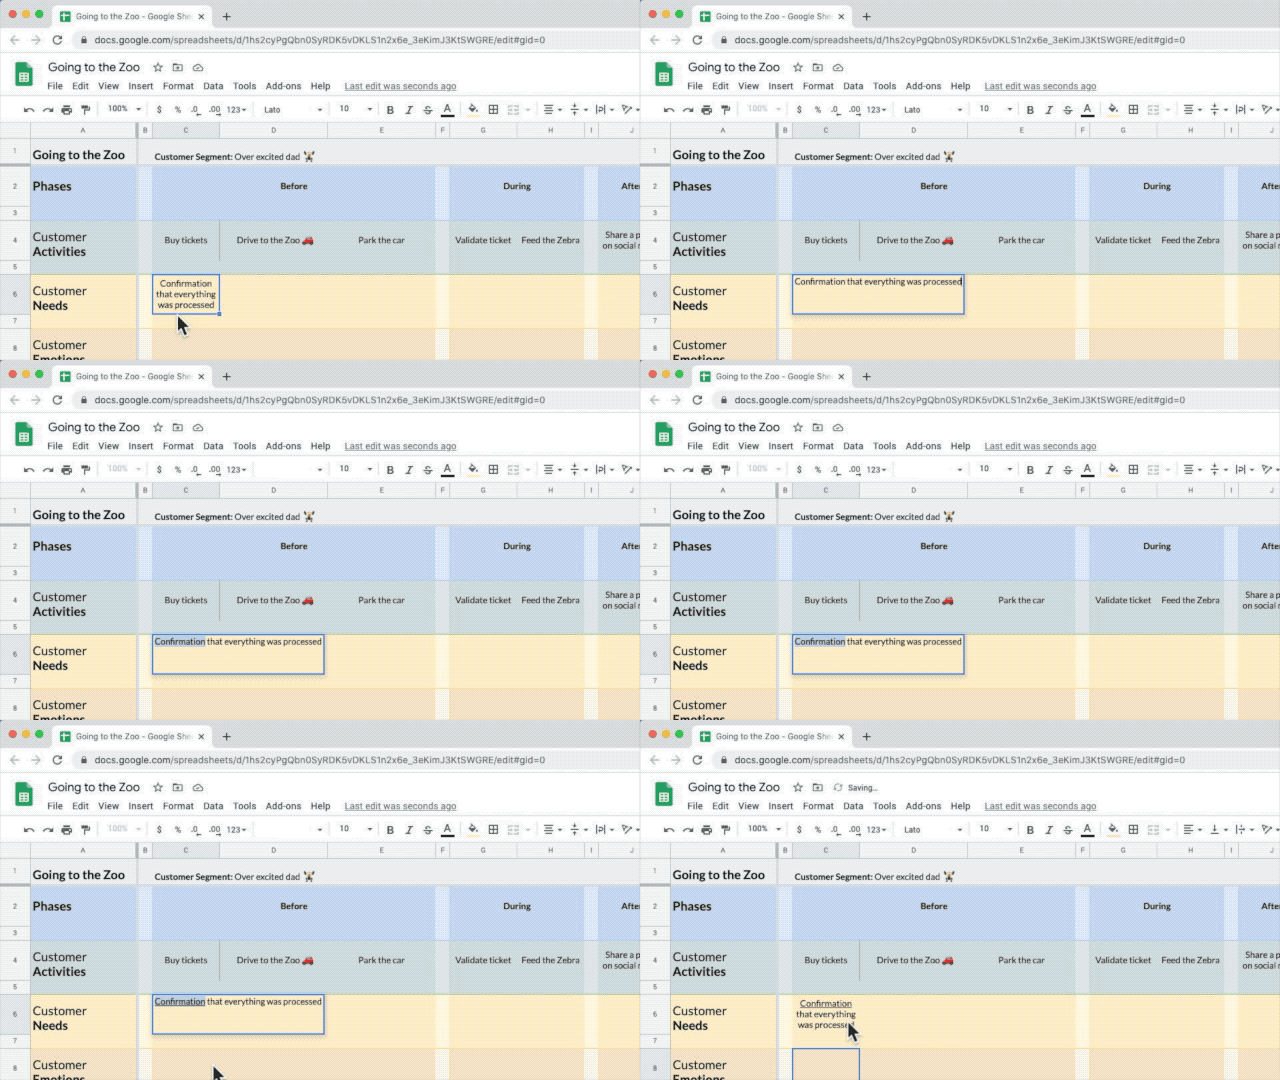
Change the text formatting to emphasise elements in your cards
When you have a lot of text in your cell it will get cut off. In that case just change the text wrapping property.
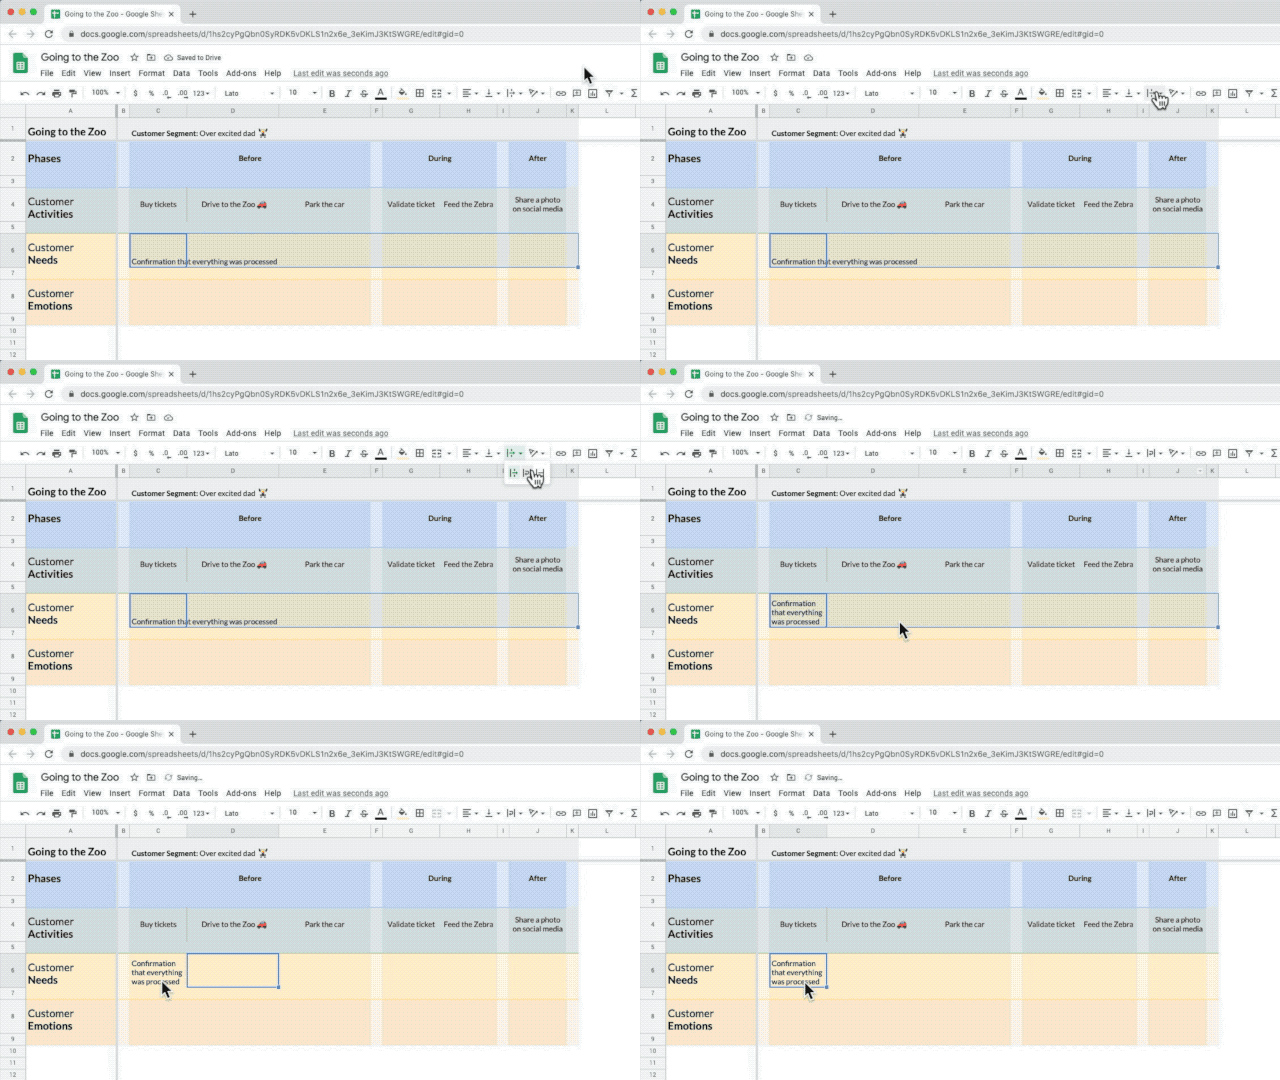
Set your text to wrap inside a cell
You might want to set the text wrapping at the start of your project so that when you're duplicating rows and columns to expand your map they will all have this setup correctly.
We're going to fast forward and fill the phases, customer activities and customer needs lanes of our map.
Step 3: Adding the curved lane
It's time to add the iconic lane that has made journey maps famous. The curved lane that indicates how your customer feels about the experience. We're going to add that to the customer emotions lane.
Drawing curved lines isn't what spreadsheets are made for but there's a pretty good alternative.
First thing you need to do is to add 5 sub lanes under th customer emotion lane. Give these sublanes a background color that has lighter shade.
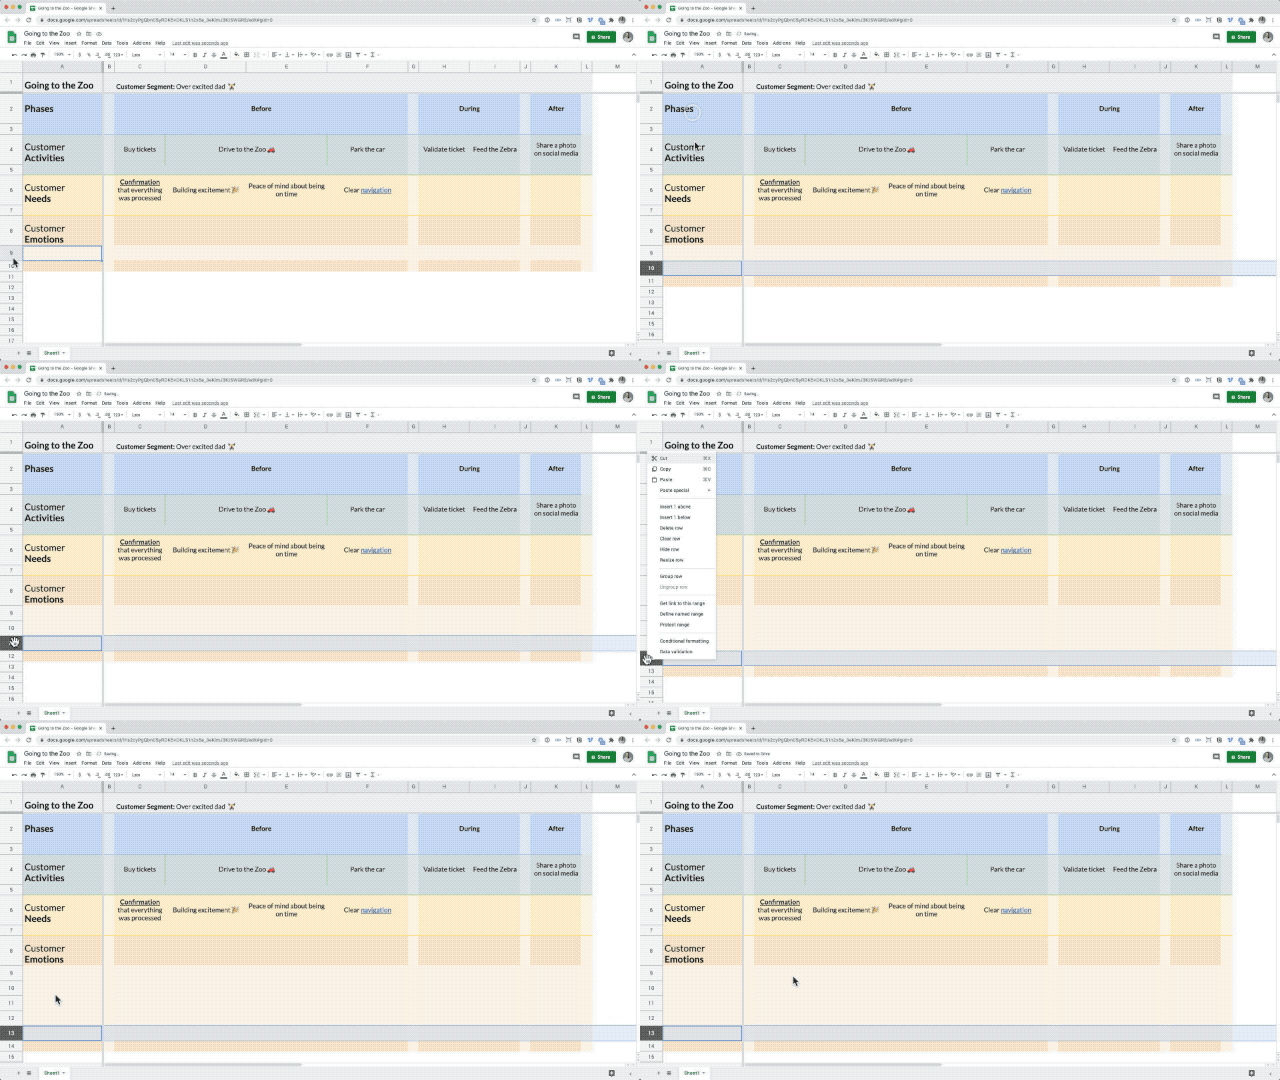
Add 5 sub lanes to the customer emotions lane
The top sublane will represent a satisfied or happy emotion. The bottom sub lane is the unsatisfied or unhappy emotion. To clarify that just add an emoticon.
Add emoticons to the customer emotions lane
Now to create the curved emotion line the only thing we need to is to give the correct cell that corresponds to a customer activity a background color. You might want to use green for satisfied and red for unsatisfied.
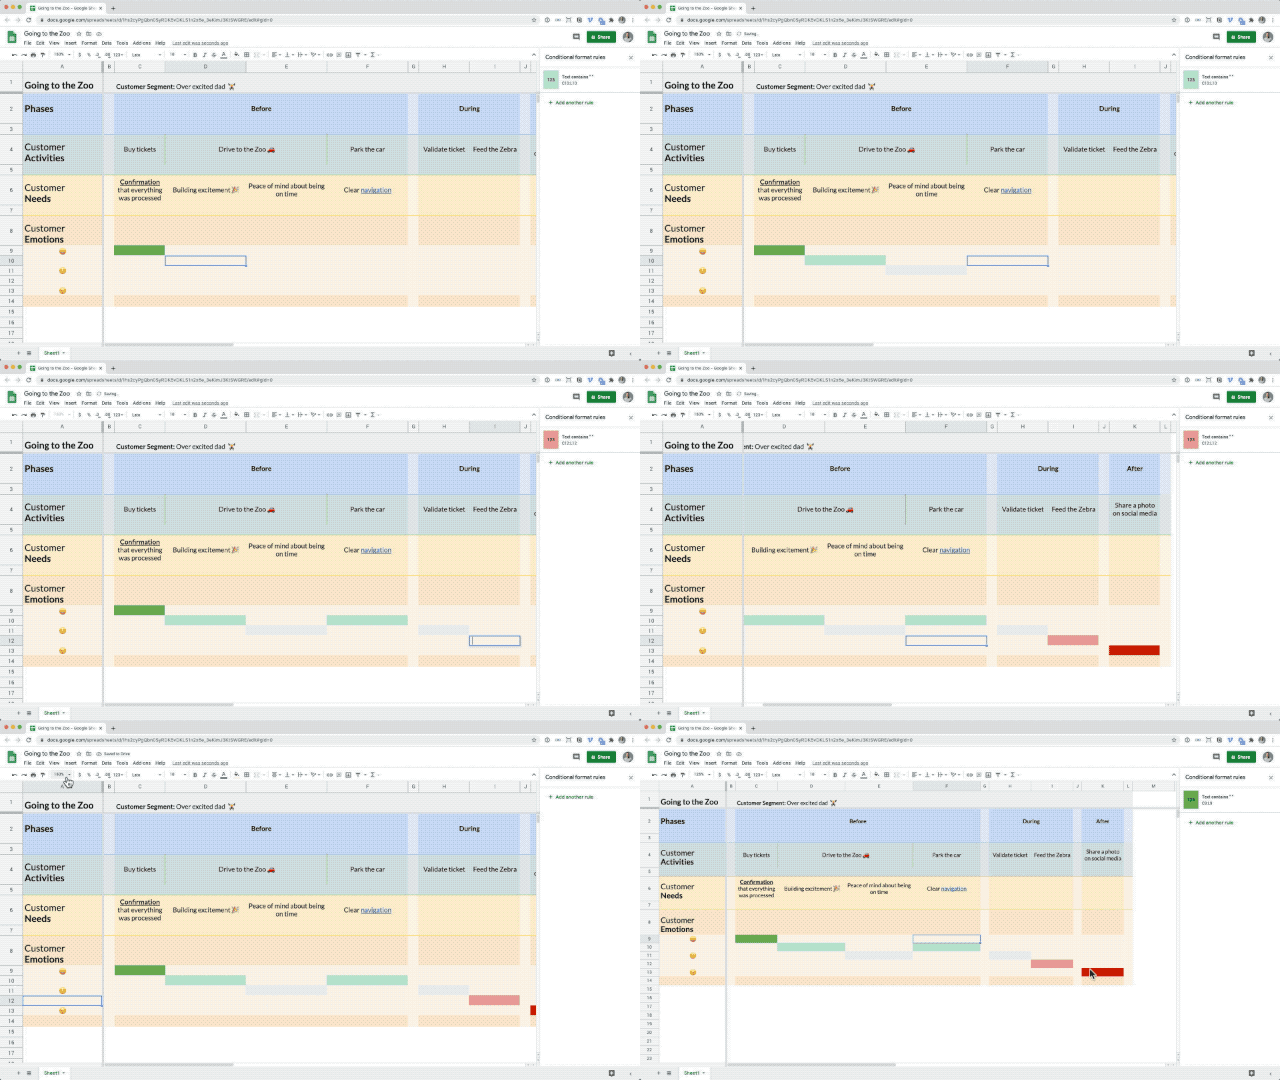
Create a nice curved lane by changing the background color in cards
In the tutorial video that's at the top of this article you can learn how you can have the background color automatically appear in the cell with the press of a single button. So if you want to save some time check that out.
Step 4: Adding empathy
This might sound like a strange step but it's a really important one. Journey maps help you to step into the shoes of your customer.
The problem that we have is that a spreadsheet doesn't evoke a lot of empathy. Otherwise every journey map would be a spreadsheet right?
So how do we fix that? We need to add human layer to it.
A simple way of doing that is by using emoticons throughout your map. This already shifts it away from being a purely left brain overview.
But even a better way is by adding images and photos to tell the story. In Google sheets you can add an image into a cell (Insert > Image > Image in cell).
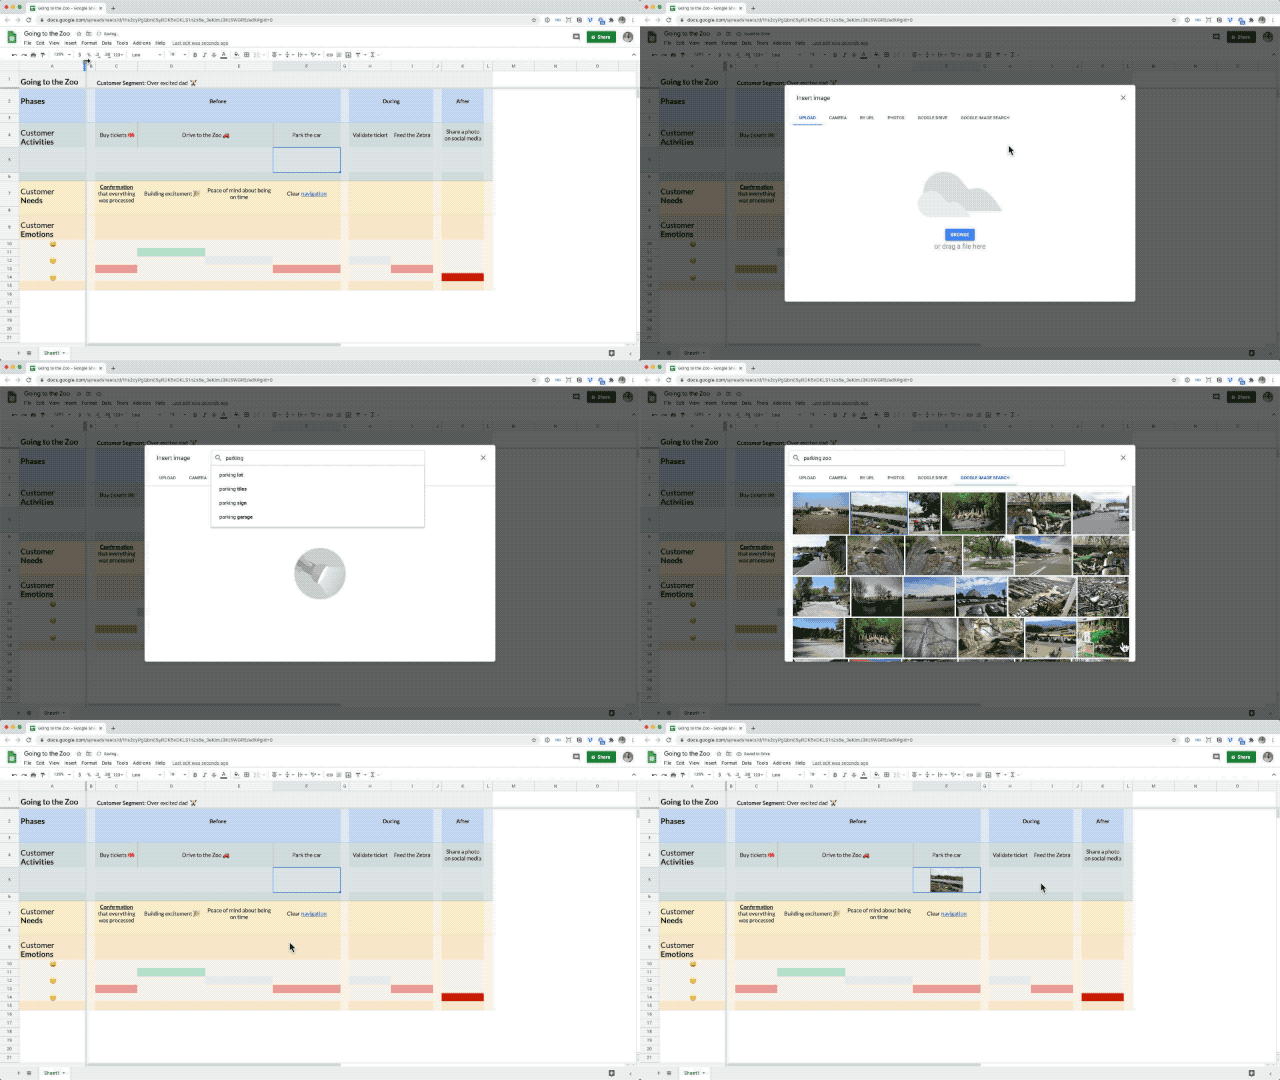
It's easy to add images to your journey map
So think about adding photos that you gained through user research to your map. Or if you haven't done any research just make a drawing of the customer activity and add that.
The caveat is that the image will be have the size of the cell so often it will be quite small.
Step 5: Adding clarity
This might sound like a strange step but it's a really important one. Journey maps help you to step into the shoes of your customer.
The problem that we have is that a spreadsheet doesn't evoke a lot of empathy. Otherwise every journey map would be a spreadsheet right?
So how do we fix that? We need to add human layer to it.
A simple way of doing that is by using emoticons throughout your map. This already shifts it away from being a purely left brain overview.
But even a better way is by adding images and photos to tell the story. In Google sheets you can add an image into a cell (Insert > Image > Image in cell).
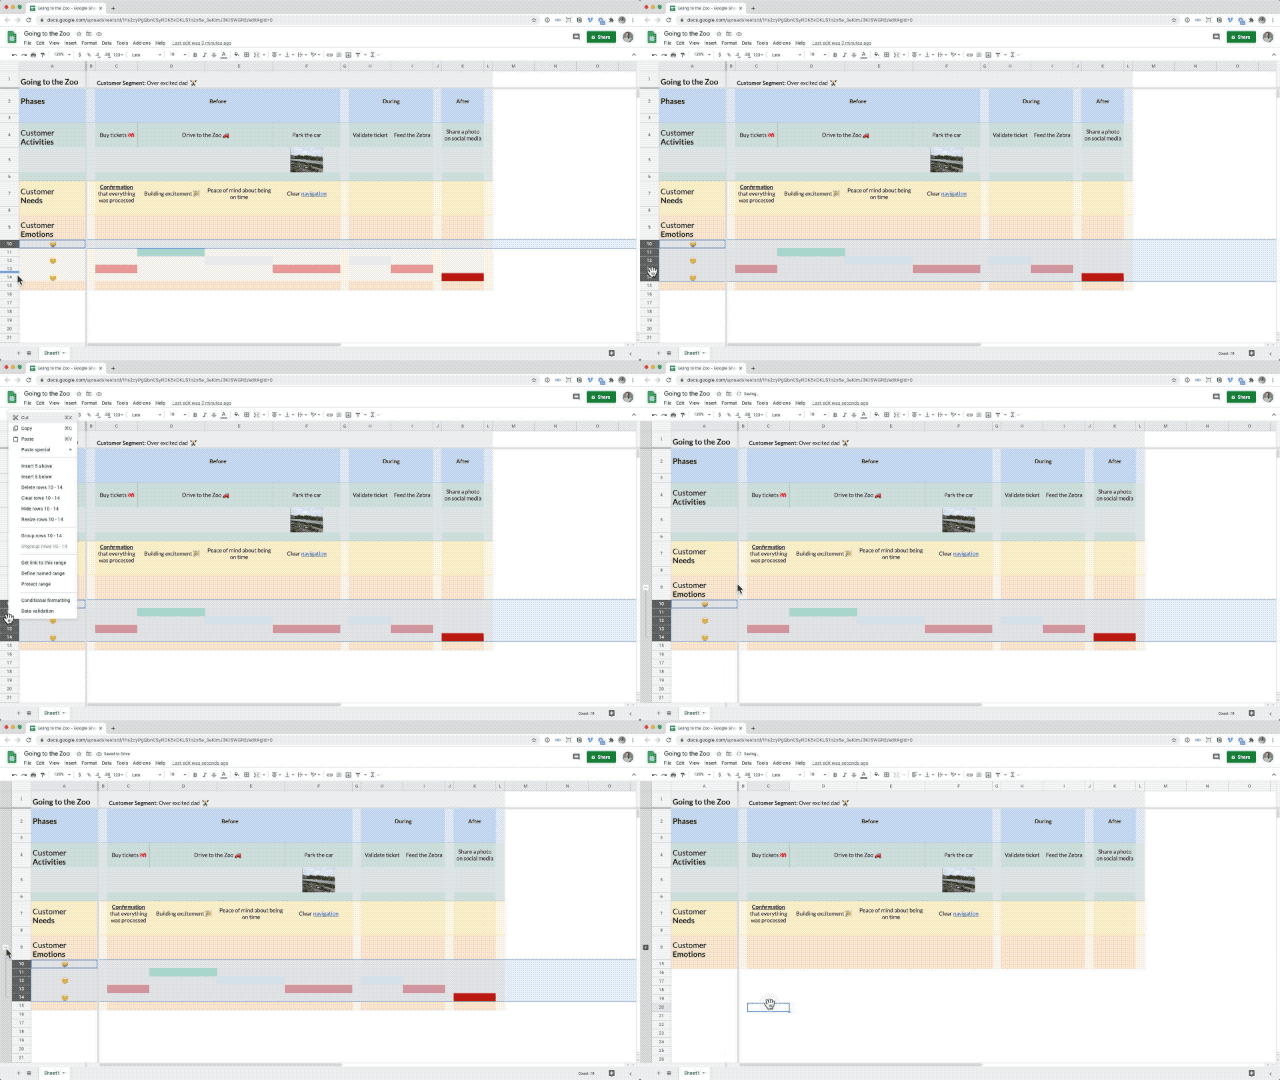
Reduce complexity in your journey map by using subgroups
You'll see a + icon appear next to your lanes. By clicking that icon you can collapse or expand those lanes.
You can have multiple subgroups inside each other. So for instance we can collapse the customer emotions lanes while also being able to collapse the entire front stage section of your map.
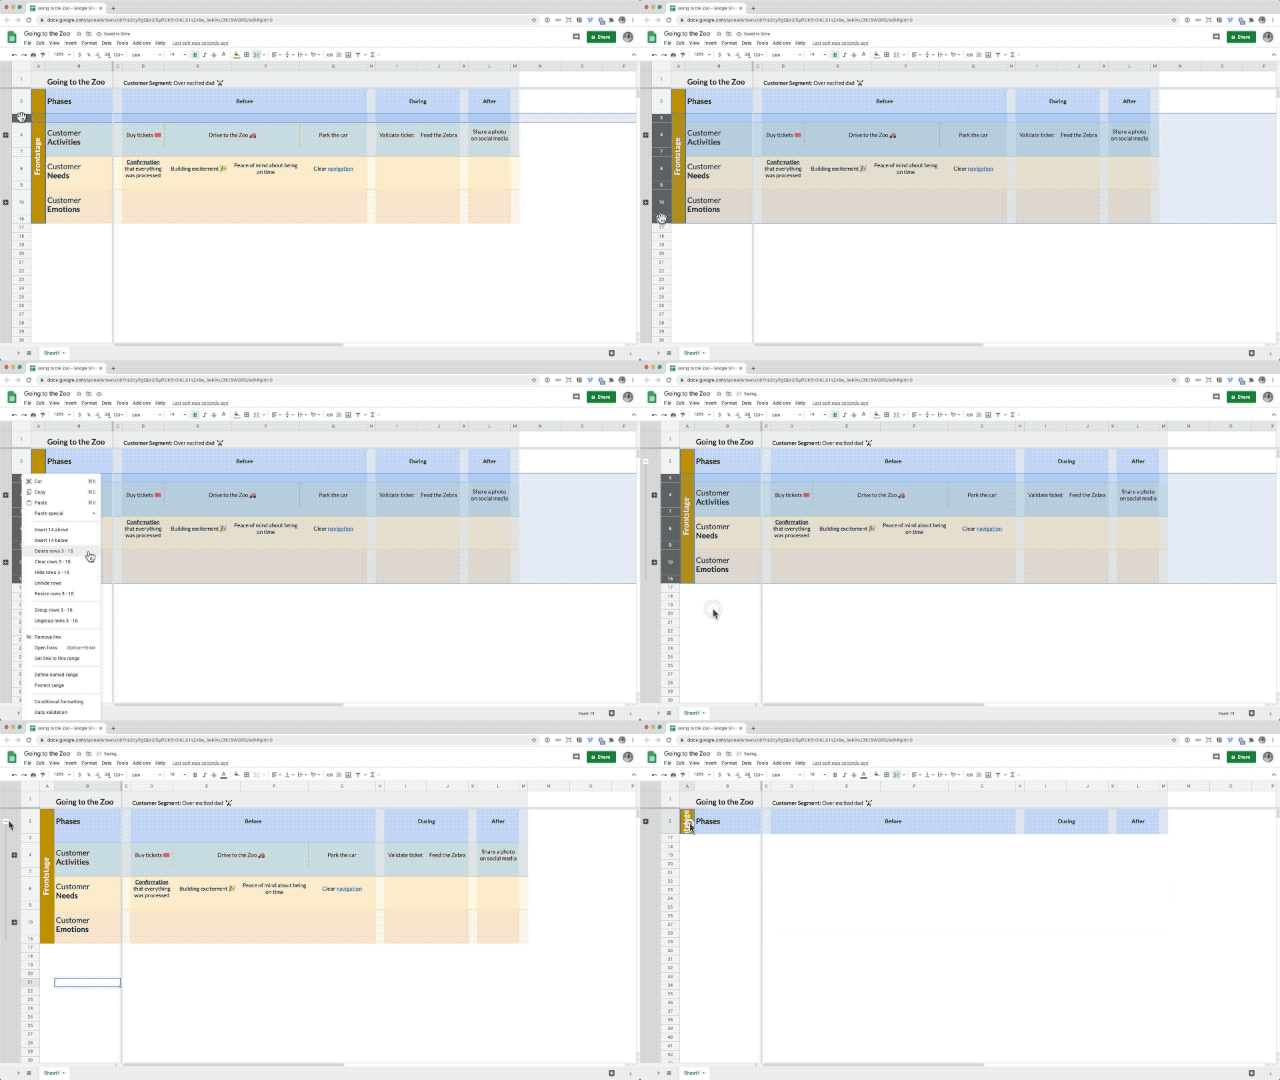
Show or hide entire sections of your map using subgroups
If you feel the need to create nest more than 2 subgroups inside of each other it's probably a sign that you need to break your journey map down into smaller maps.
Advanced features
A customer journey map isn't a static deliverable. It's an evolving change plan that you use to drive customer centric innovation.
So now that we have our basic journey map set up let's look at some of the more advanced features. These are features that will make your life a lot easier when you use your journey map on a day to day basis.
Updating the map
Using the journey map means updating the map. You'll want to add and remove details in the map.
This is where you see a clear distinction between different journey mapping tools. Some tools are great at visualizing the map but break apart when you need to change things.
Let's see how easy this is using Google sheets.
Lanes
Changing the order of lanes is as simple as dragging and dropping them. The only thing you need to be mindful of is when you have selected lanes that contain merged cells.
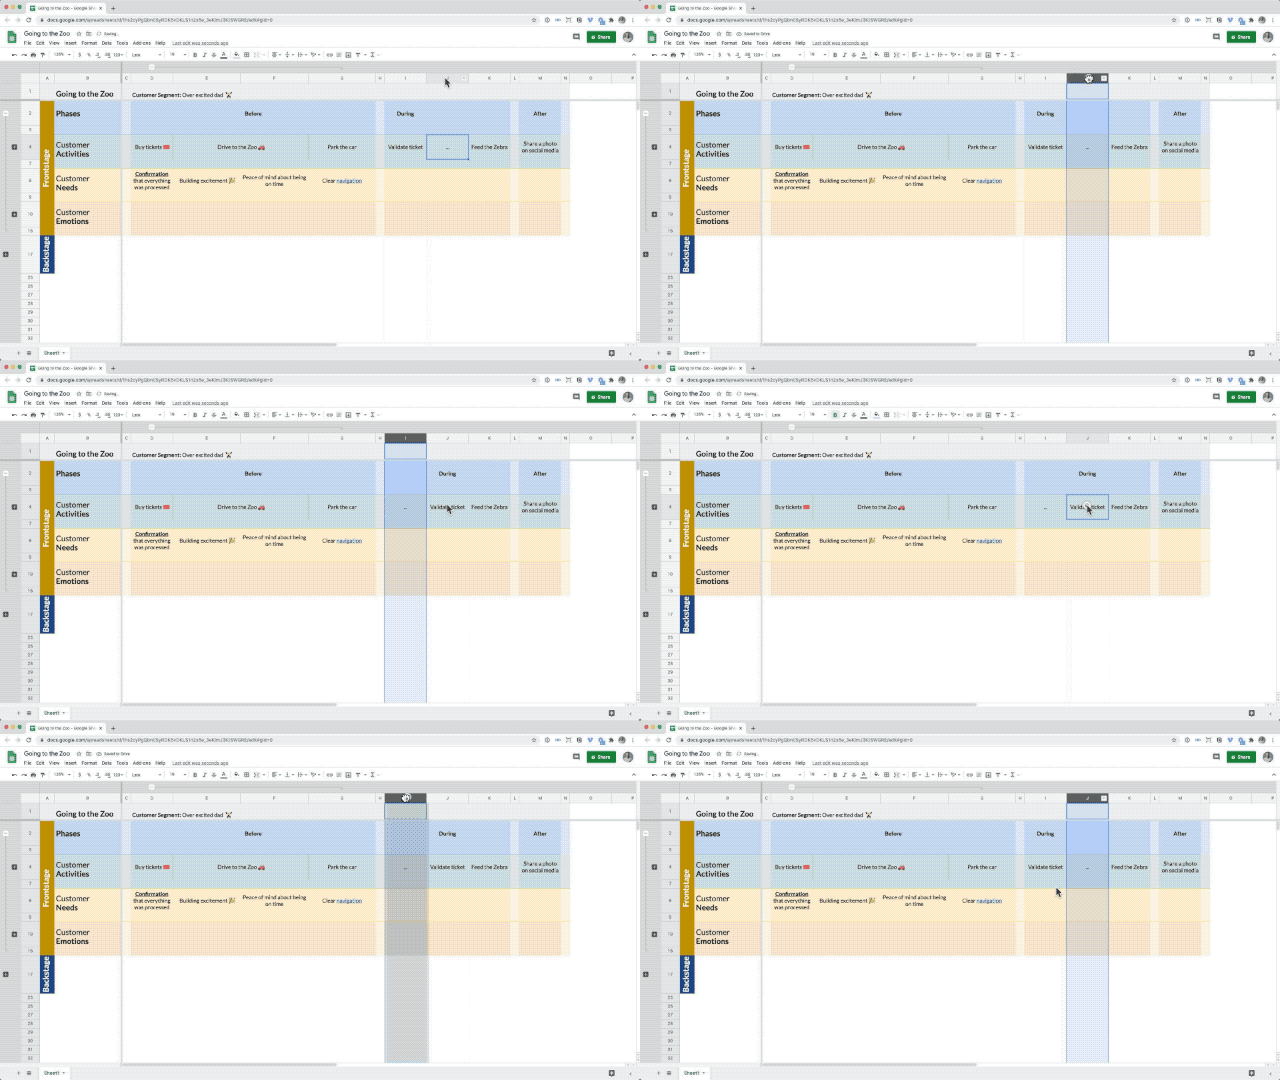
Drag rows or columns to update your journey map
Adding new lanes is also really straight forward. Just right click in the place where you want to insert the new lane and add it.
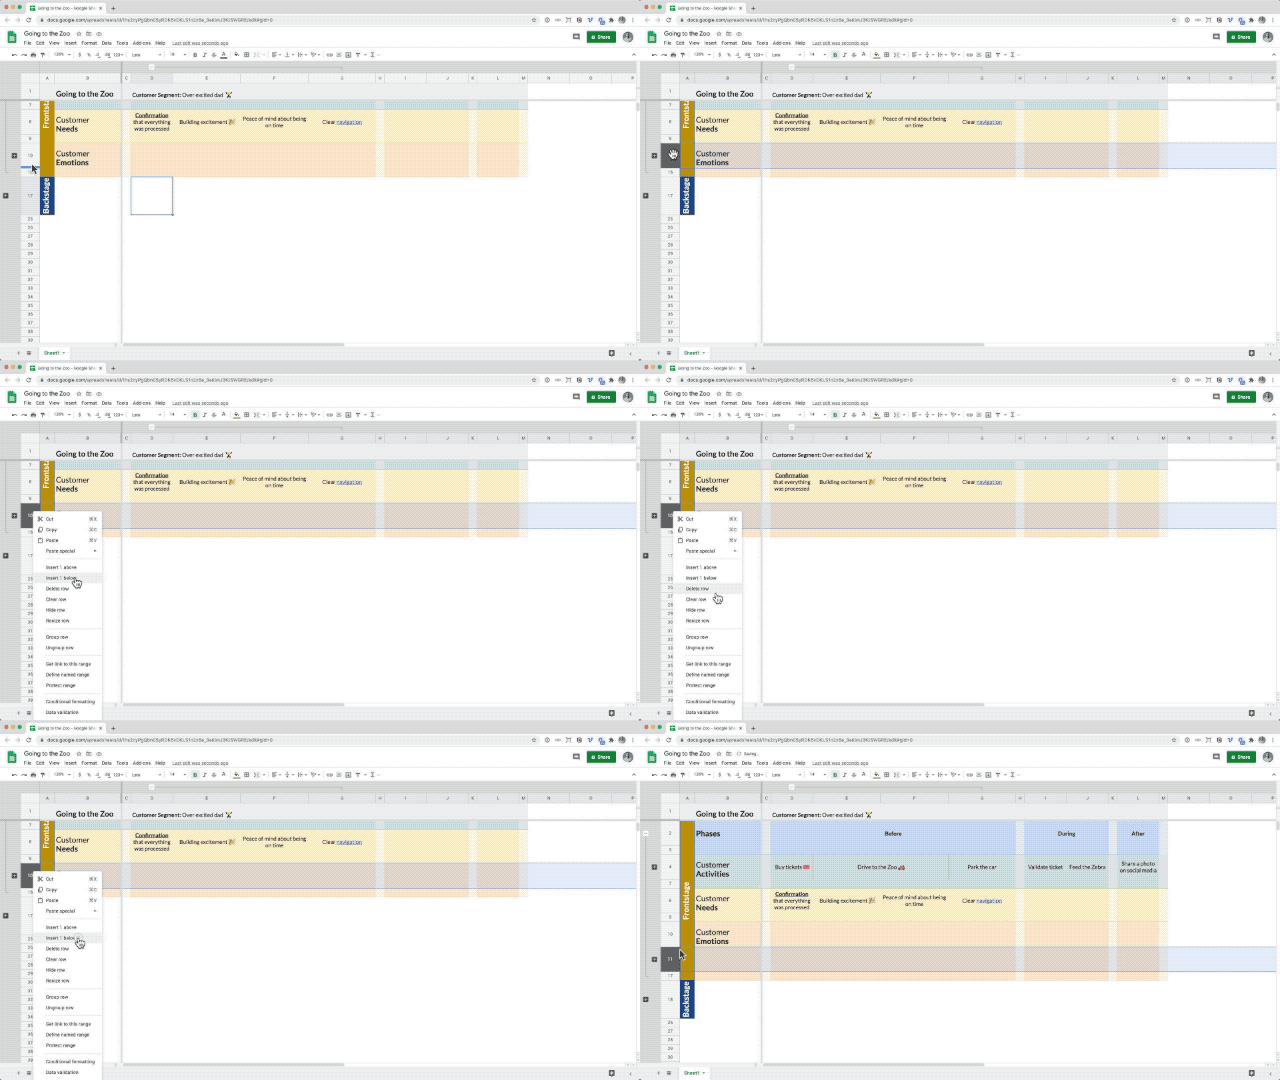
Adding new lanes is easy
Here you will benefit from having the separator lanes set up as described in step 1.
Cards
Let's say you want to add a new customer activity to your map. The way to do that is by inserting a new row. Just right click in the place where you want to insert it and select add.
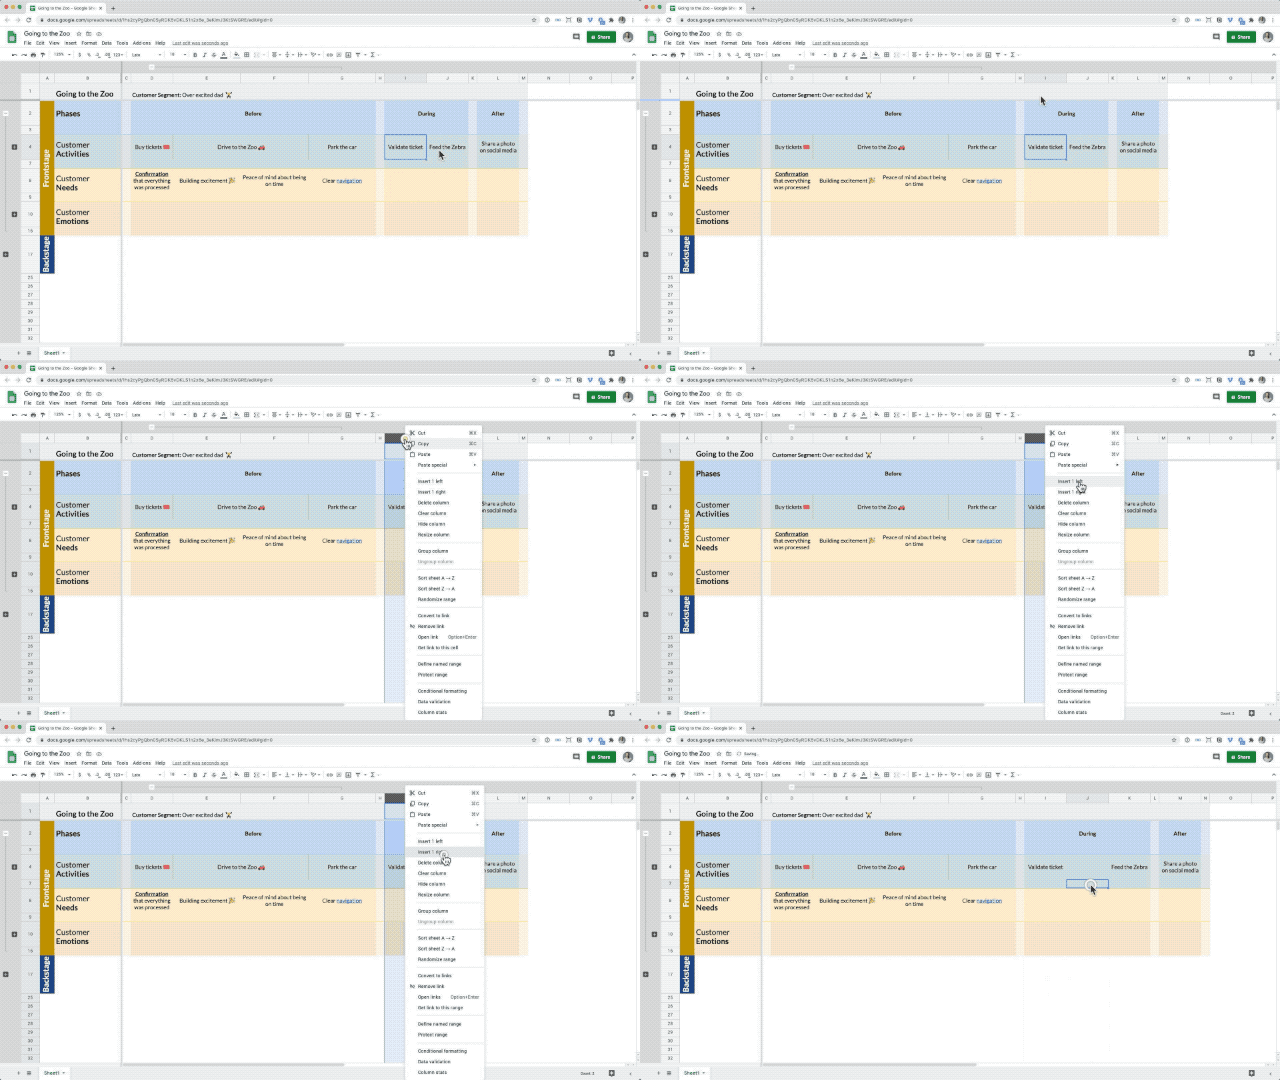
Add a row to make room for new cards
Keep in mind that when you insert a new row you will get a empty cell in all your lanes. This is usually what.
Moving individual cards around is a bit more difficult. You can't just drag and drop them
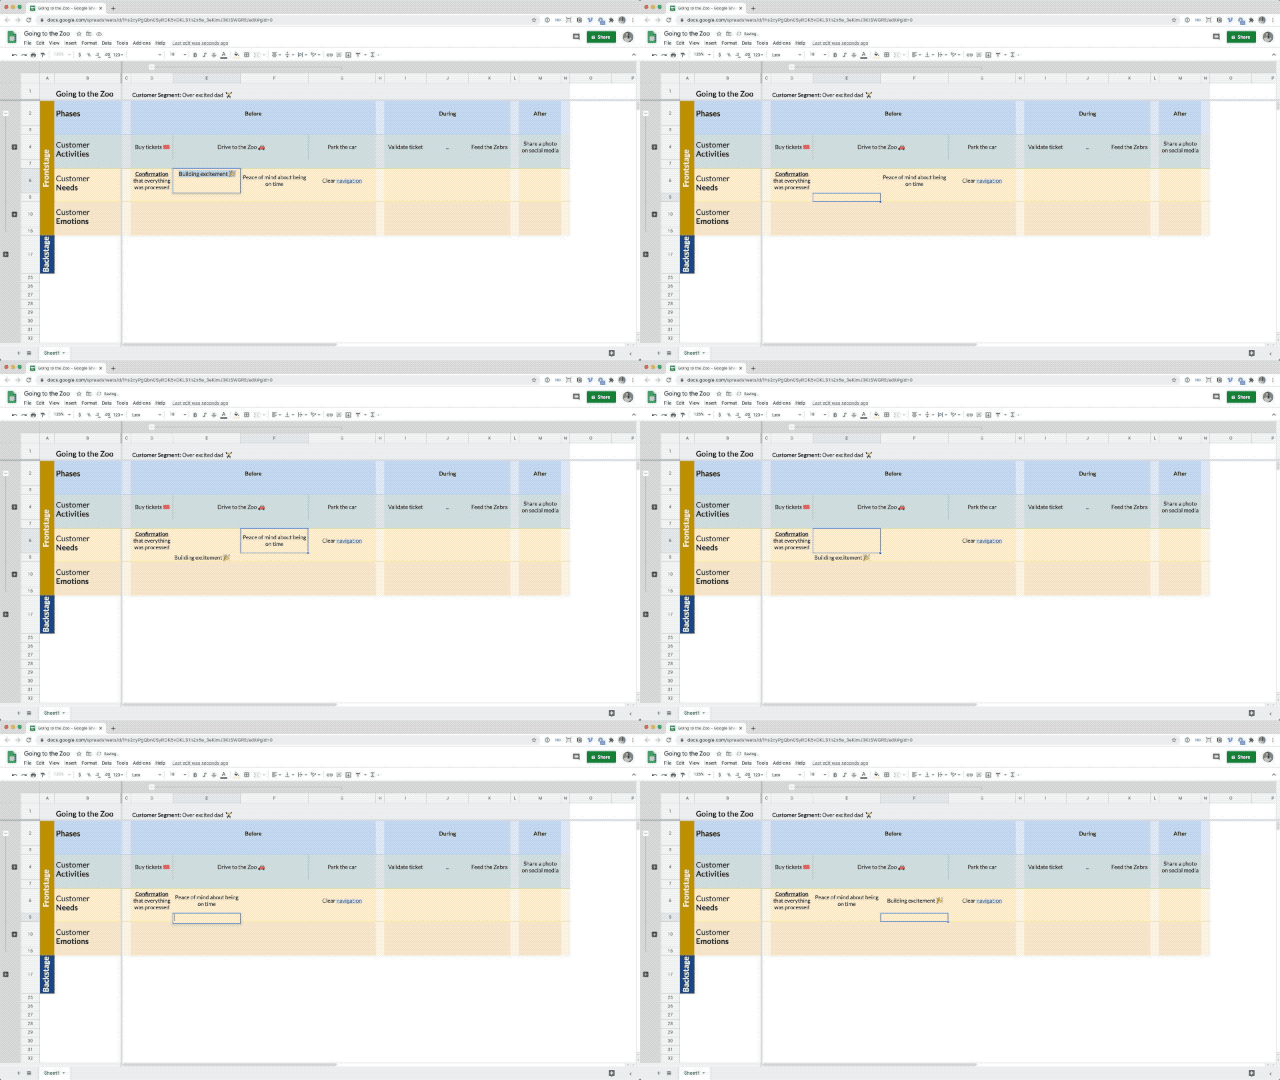
Moving a card means doing some manual copy and pasting
You will need to manually cut and paste the content of the card to your desired cell. It's not hard. Especially if you learn to use the keyboard shortcuts.
Tracking status
This is one of the most overlooked features by people who are just starting out with customer journey mapping. But it's one of the most important features a professional needs.
It's the ability to quickly see in the map what we're working on. And who is doing what. As we said before the journey map is a change plan not a static image.
There are a few ways you can track status in your map using Google sheets.
A simple way is to change the background color of a card to indicate a status. Green cards could be new things that you're implementing and red cards could be things that need to be removed from the journey.
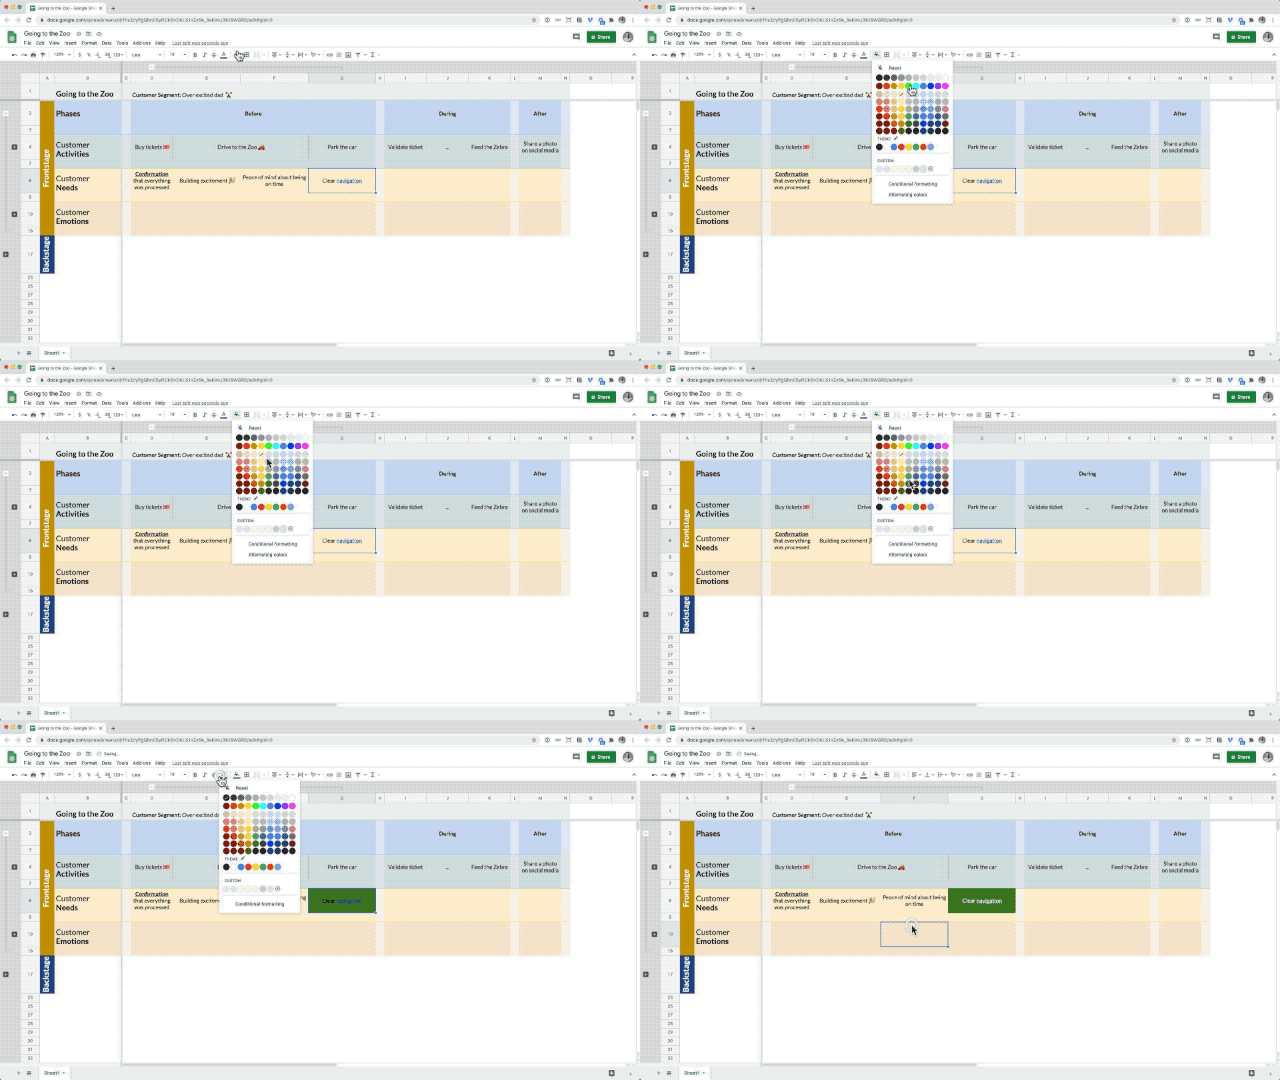
Use a background color to indicate a status
The other way you can indicate a status is by using cell borders. A thick green or red border is a strong visual cue.
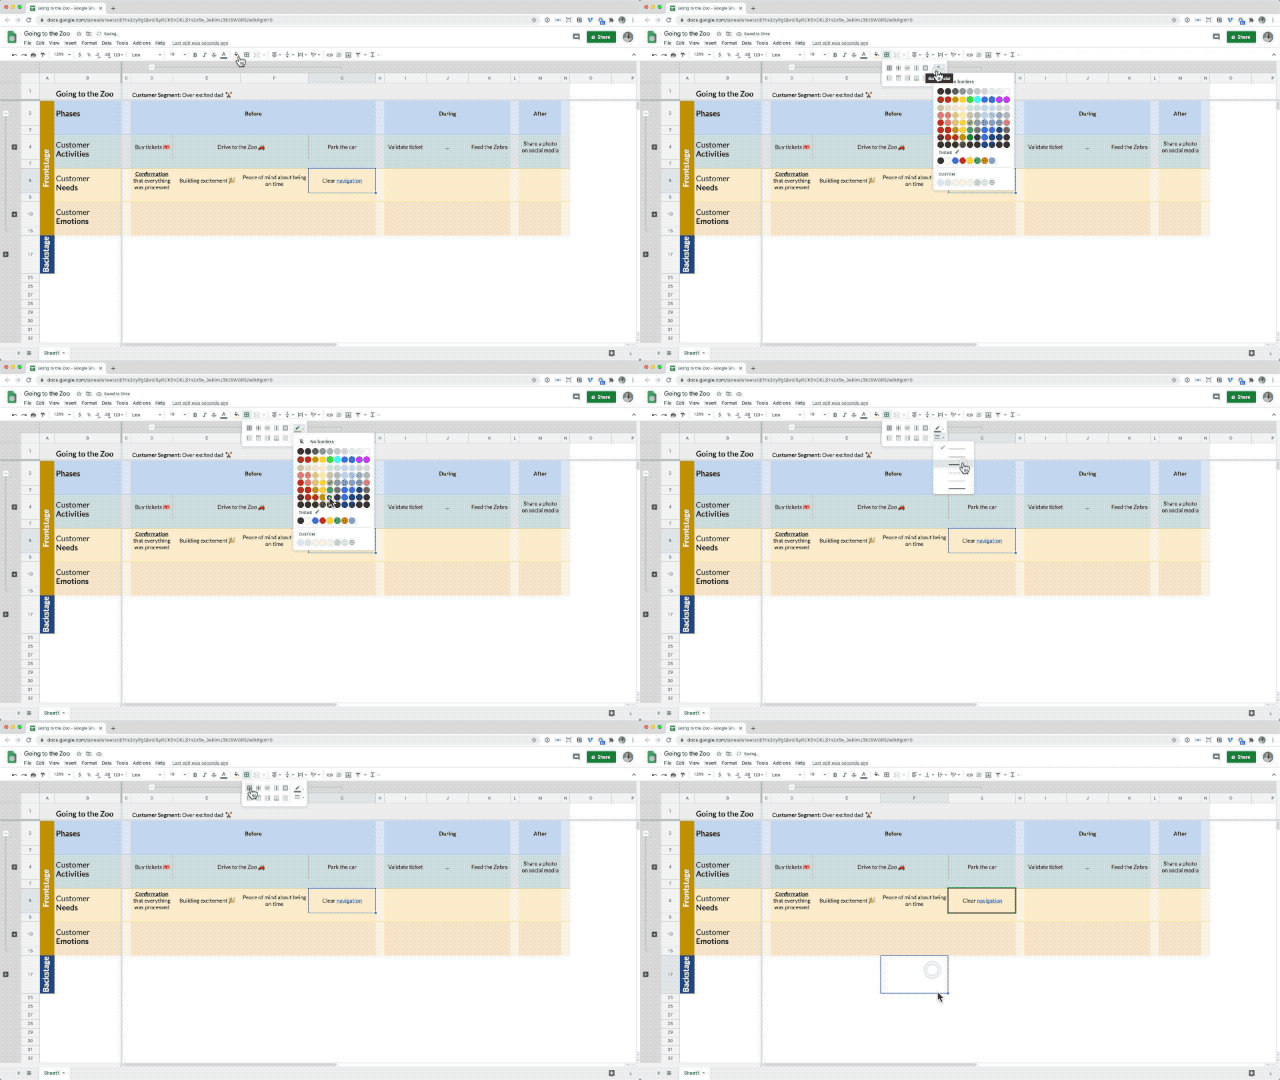
Use borders to indicate a status
What I strongly recommend you do when adding a status to a card is to also add a comment explaining what that status means. You do that by going using the Insert > Comment option.
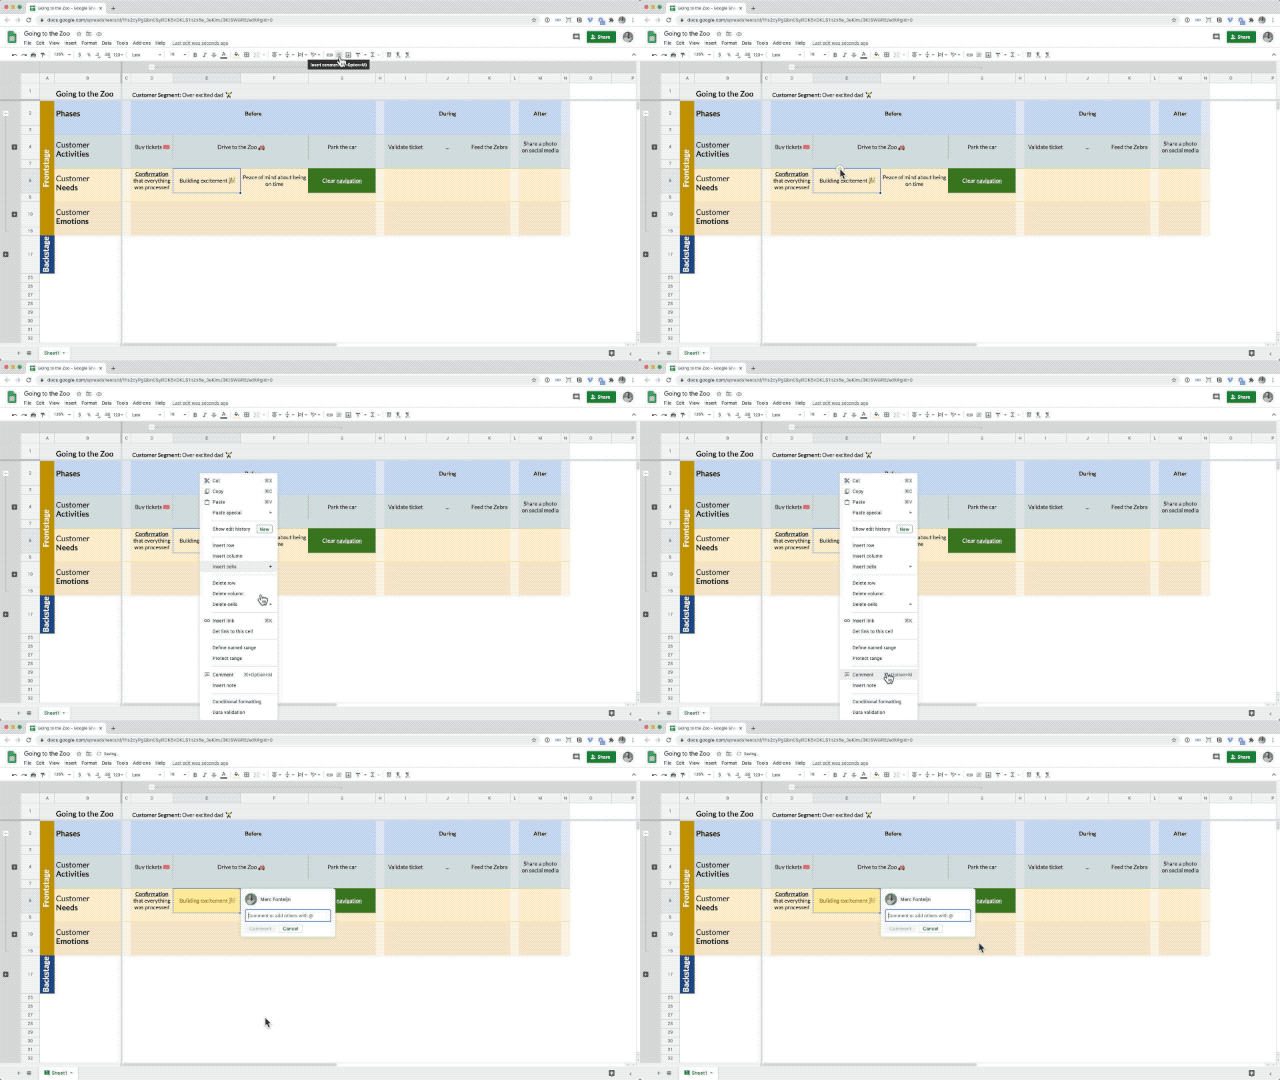
Add context to cards by using comments
This brings us to the next important feature a professional wants in their journey mapping too.
Tracking progress
When you work on your journey map with a team (which you always should) a critical feature that you from your tool is to see what how your map has changed.
You want to see the progress you've made over the last 4 weeks and ideally who has contributed what. Google sheets has this feature very well implemented.
To see how your map has evolved just go to File > Version History > See version history.
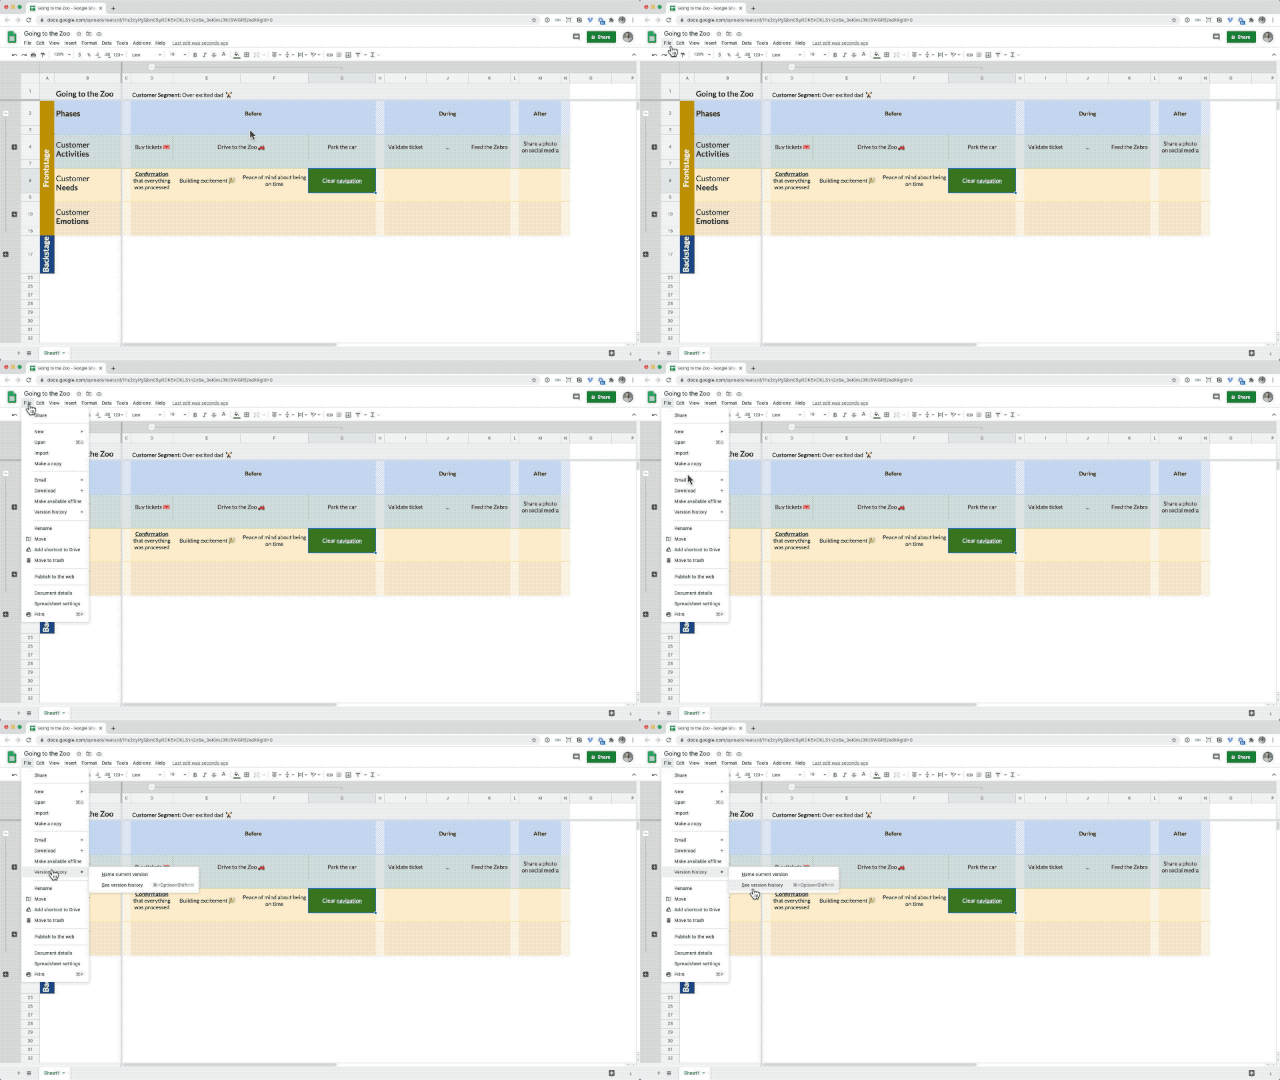
Keep track of how your journey map has evolved using the version history feature
Using this option you can also create named versions of your map. Which can be really useful to indicate major milestones. For instance when you have added a lane for a new department to the map.
The cool thing about Google sheets is that you can see the changes on a per cell basis. Crazy!
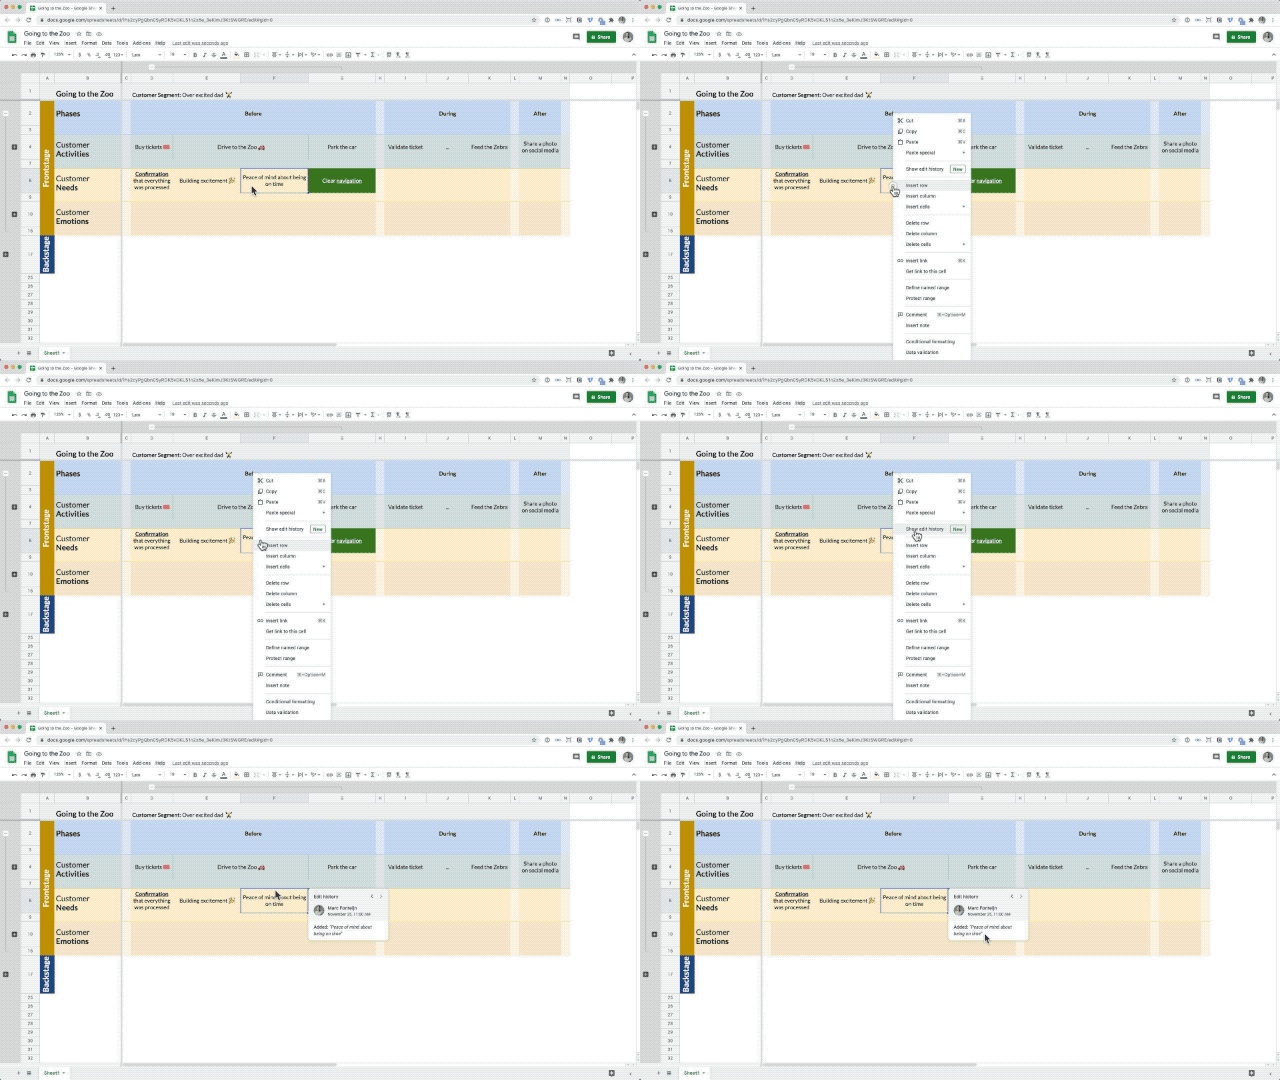
Track changes to a specific card using cell history
Journey mapping is a collaborative process. This means that your tool should allow you to share the map. It won't come as a surprise that Google sheets excels at this (phun intended).
Collaboration
Being a Google product of course collaboration features are very well implemented in Google sheets.
Sharing the map
The most basic thing you'd want to do is to invite someone to work on the map together with you. You do that by via the Sharing option and make them an editor.
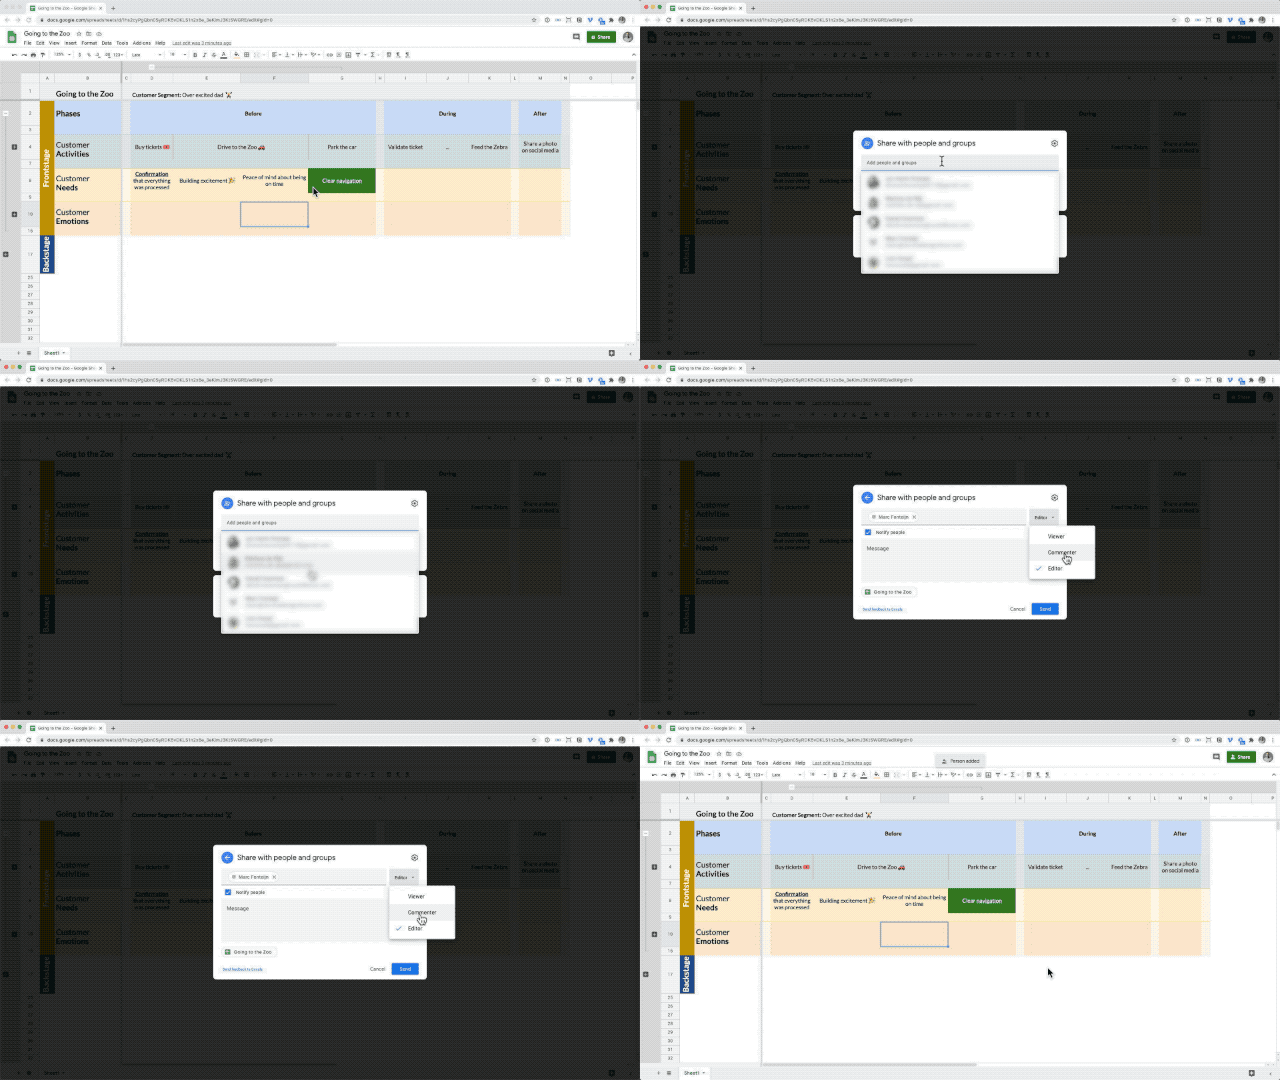
Share the journey map inside and outside your team
You can also give read only access to someone. This is useful when you want to spread the map in the organisation to gather feedback but don't want people to mess around with it.
Linking to cells
Another very useful collaboration feature is that you can get a unique link to any cell in the journey map.
Imagine that you want to get input from the HR department. Rather than just sending them the map and hoping they will find the right place to look, you can send them a link which opens the map directly on the HR lane for instance.
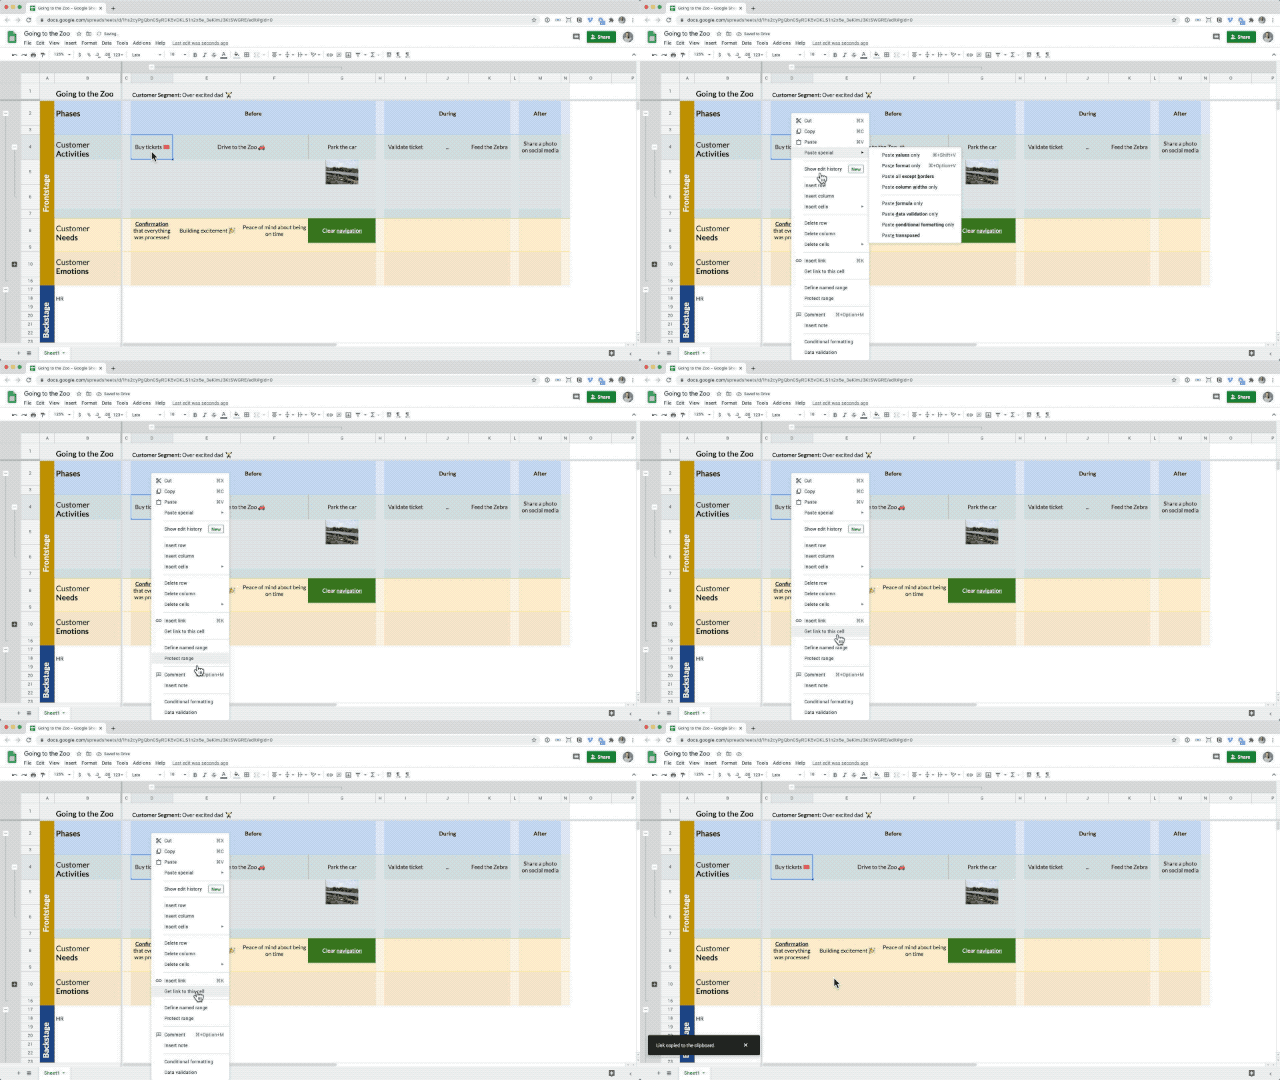
Get a unique link to any card in the journey map
It's small features like this that make your day to day work so much easier.
Adding safe gaurds
You know those inflatable tubes they add to your bowling lane to as a safe gaurd that all your balls end up in the gutter? Well Google sheets has something similar. And it's feature that you'll appreciate.
You can protect certain parts of your map from being edited by other people. You do that by selecting a group of cells and opening up Data > Protect Sheets and Ranges.
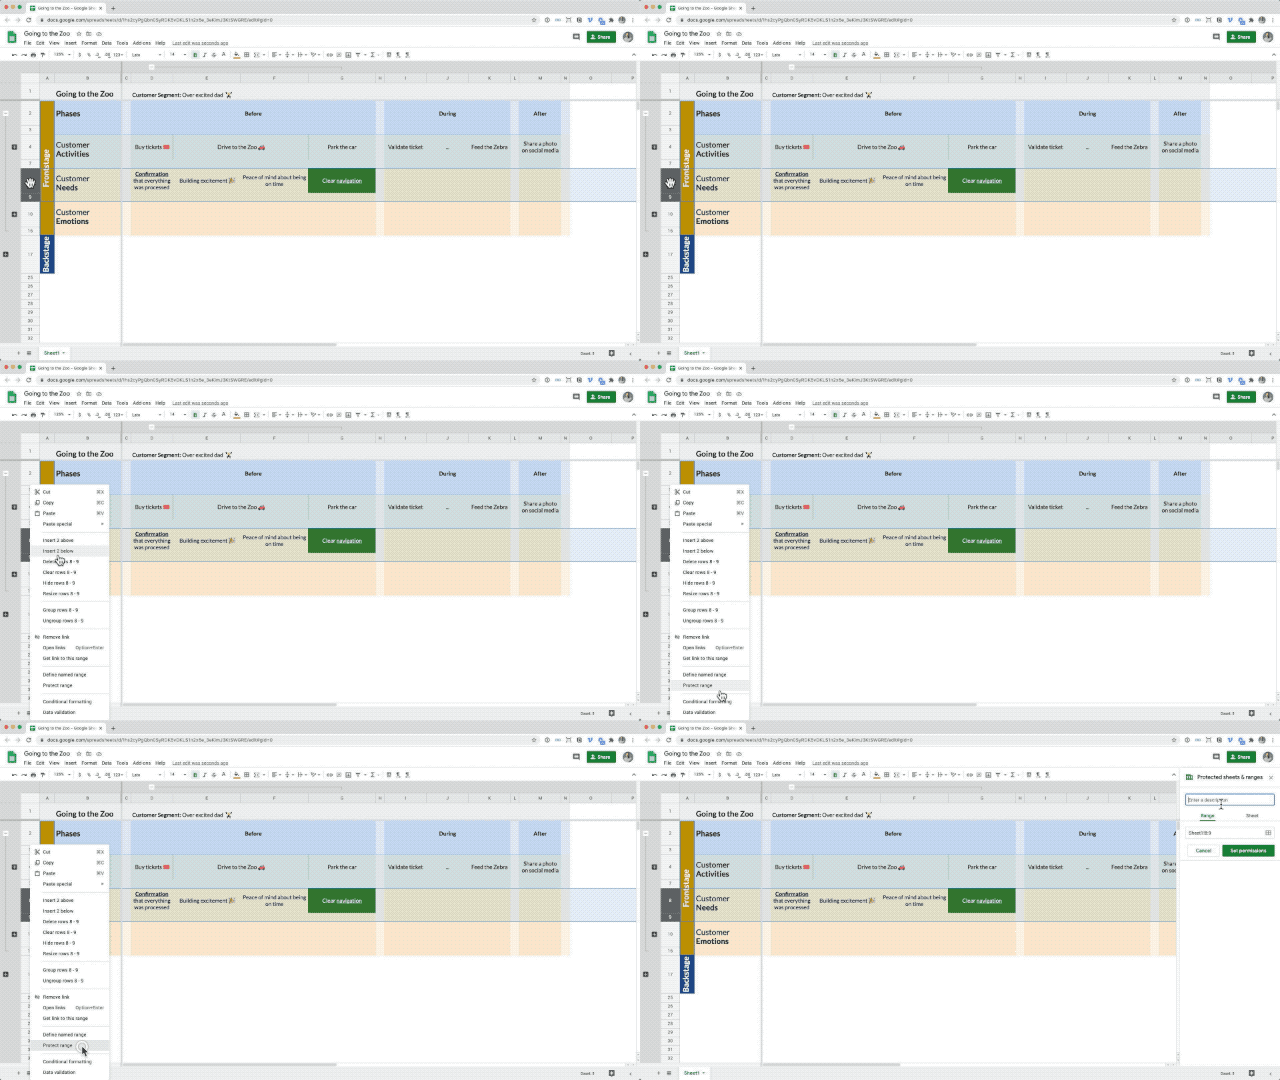
Prevent people from editing specific parts of the journey map by protecting ranges
Why is this useful? Imagine again that you want to get input from the HR department on the journey. You send them the correct link to the map as described above. And next to that you tell them that the map is setup in a way that they can only change the HR related things.
Sometimes people are reluctant to contibute to a journey map as they don't want to mess things up. Telling them that you've put safe gaurds in place will give them more confidence to contribute.
Tagging people
The final collaboration feature which you need to know about is the ability to tag people.
When you use the @ sign in the comment feature it will provide you with a list of people you can then tag in the comment. What's great about this is that the person you've tagged will get a notification through email that they have been tagged.
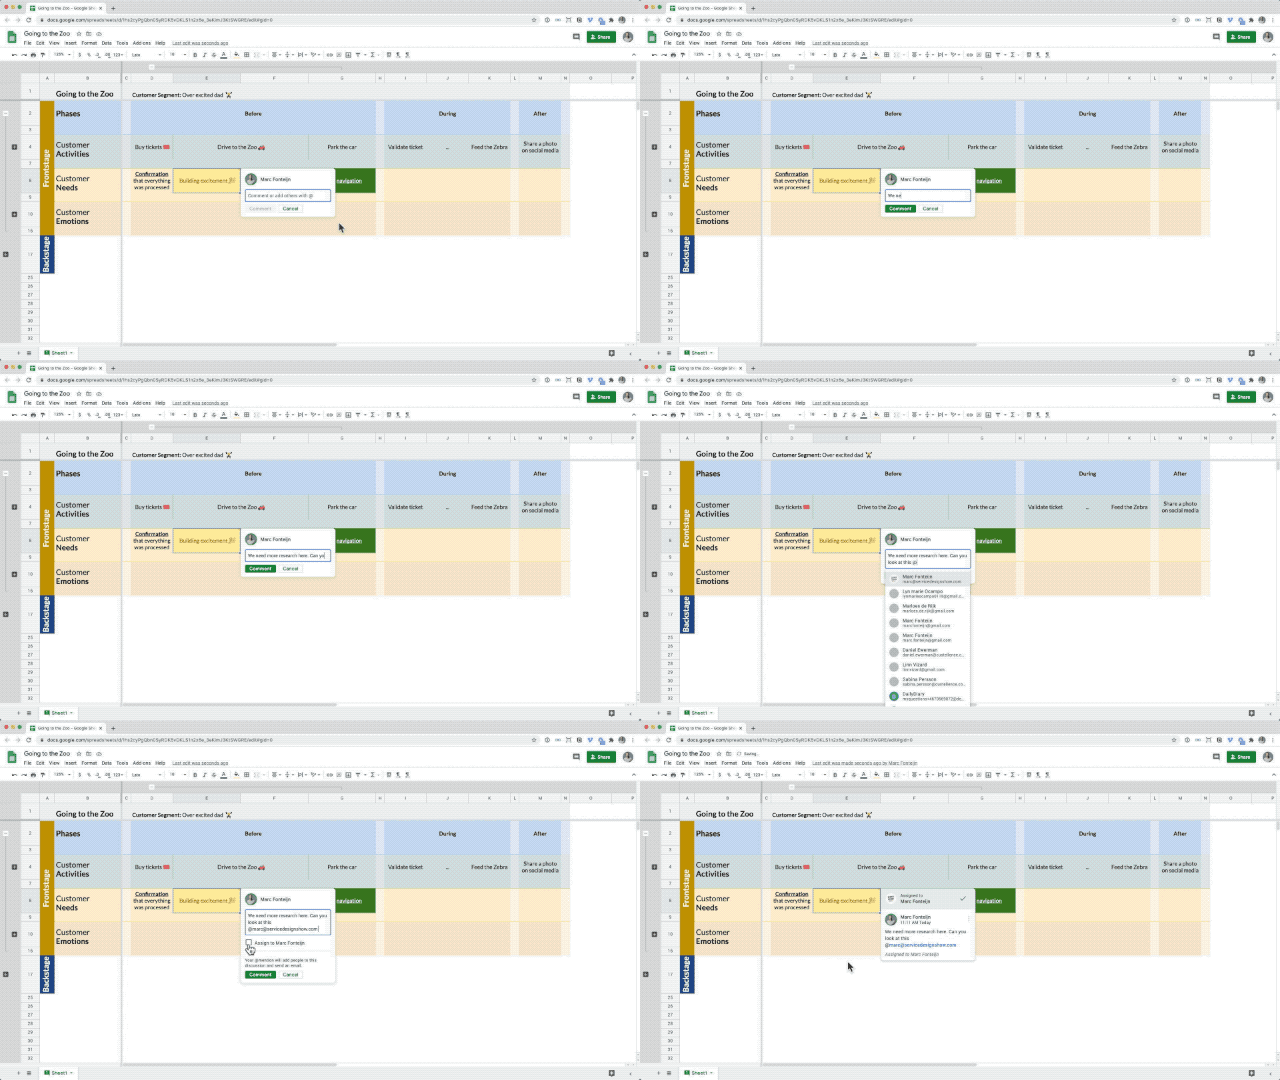
Tag people in the comments and send them a notification
This is extremely useful as it allows you to keep the discussion tied to the relevant parts of the journey. Rather than going back and forward via email or slack without any context.
Again this is one of those small things that just makes your life as a professional so much easier.
Exporting and printing
Imagine that you need to show the journey map to your boss tomorrow. So you want to export the map as a PDF document and send that over. Or in a world where we have physical meetings again you could print that PDF and present a tangible version of your journey map.
Google sheets makes this really easy. Go to File > Download > PDF adjust the settings to your liking and you're done.
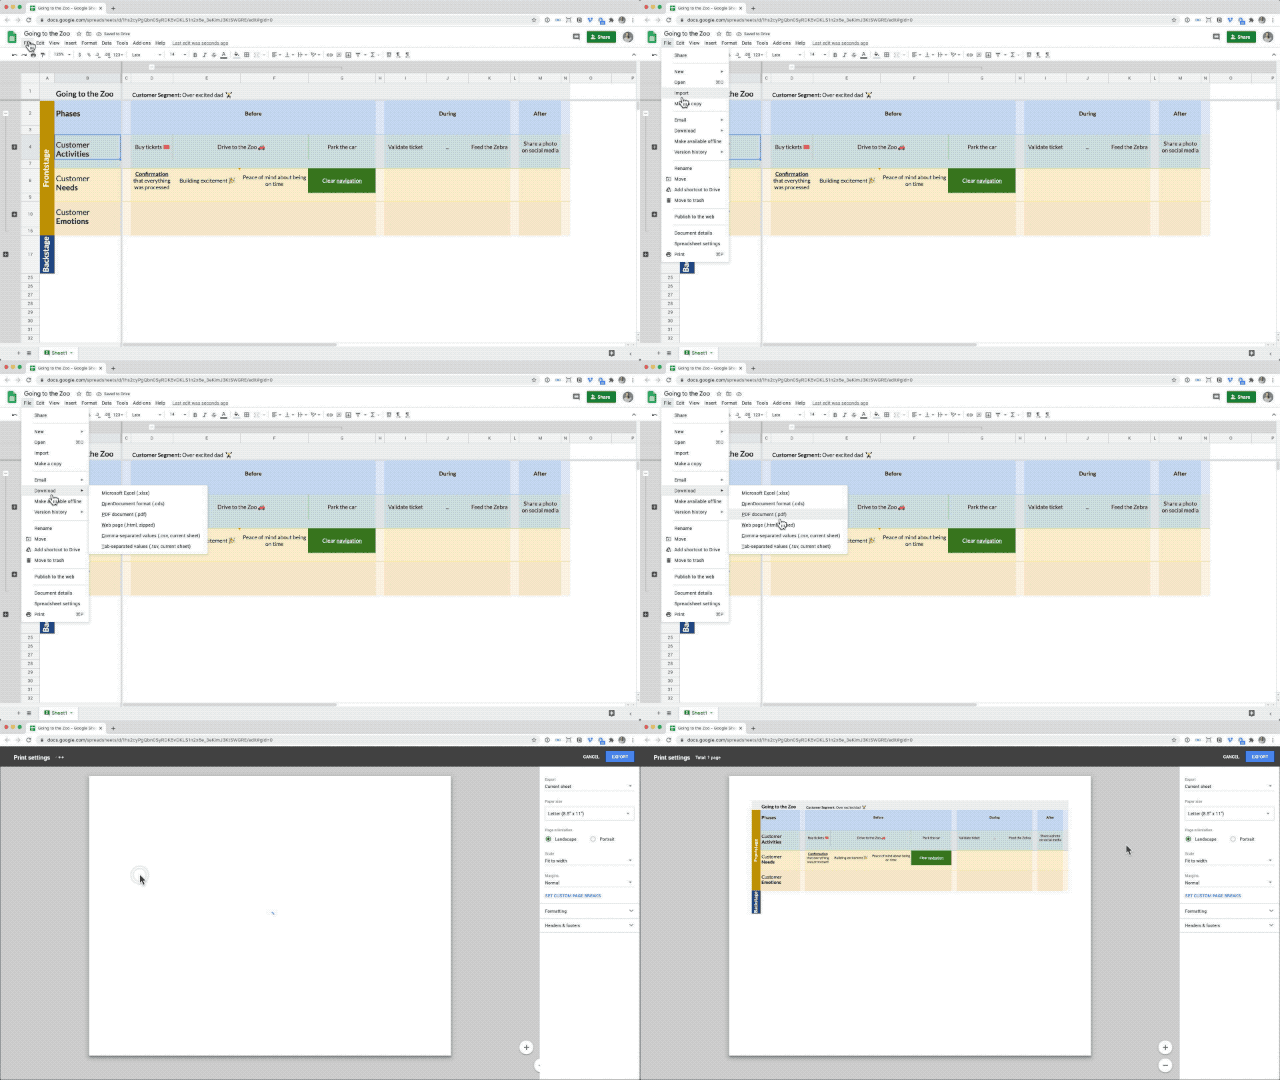
Export the journey map ready to print
Maybe you don't want to show all the deails of your map to your boss and just want to provide a high level overview. You've learned that using subgroups you can hide certain parts of the map.
What's nice is that the hidden parts are excluded from the exported version as well. So what you see is what you get.
Finally you can also select a specific part of the map and export that. So you could export the HR lane only or just the before stage of the journey. It's really up to you what you want to show.
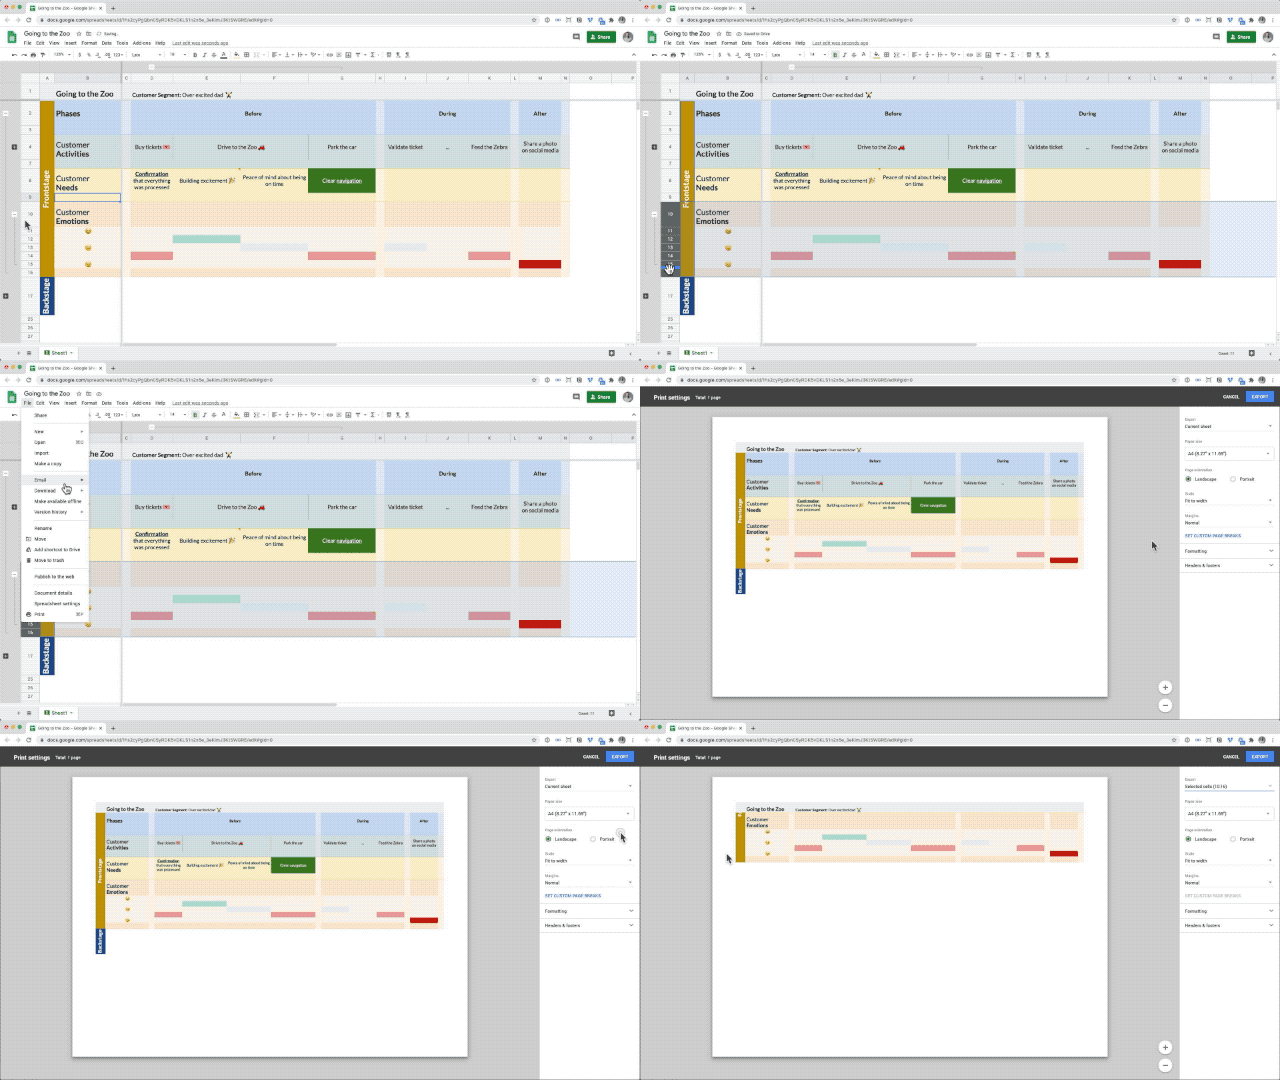
You can also export specific parts of the journey map
We've covered a lot of ground so far. Now it's time to answer the big question.
Is Google sheets or Excel a viable customer journey mapping tool?
Conclusion
Drawbacks of using Google sheets or Excel
If you've been following along you will have seen that Google sheets has a lot of potential as a journey mapping tool. But it also has some drawbacks which you should take into consideration.
No guiding structure
A spreadsheet are basically a blank canvas. You can do anything with them. This also means that it's up to you to come up with the structure of your journey map. If you've never create a journey map before this process can be a bit daunting. You can always start with a journey map template and modify that so it fits your needs.
Risk of losing empathy
Journey maps should tell a story (link naar what is a CJM). A disadvantage of using Google sheets is that it's not designed to tell stories by default. So it's very tempting to create a very left brain and rational journey map. Before you know it your journey map has become a process map that communicates zero empathy.
You've seen how to add a visual layer to your journey map. It's definitely doable. You just have to be a bit more mindful about it compared to some of the other journey mapping tools.
Harder maintain a consistent visual style
This is especially true as soon as you start messing around with things like background colors and borders. You'll find yourself fiddling around with the visual aspects of your journey map quite often. And let's be honest this is not where you want to invest your time in.
No integration with other templates
Some journey mapping tools allow you to create personas, stakeholder maps and other artefacts related to the service design process. Google sheets will never have that feature as it's a generic tool. Of course there's nothing stopping you from creating something like an empathy map in a spreadsheet. But be careful that Google sheets doesn't become your hammer and everything else a nail.
Potential licensing issues
When you introduce a new tool in an organisation licensing is always an issue. Your company might have a strict policy that doesn't allow the use of Google or Microsoft products. When you're still flying under the radar you might get away with it but when you need to start collaborating on the journey map across the organisation it becomes a problem.
Doesn't have a professional feel
Think about it. Every professional has its own set of specialized and dedicated tools. This goes for your car mechanic but also for your colleagues working at the finance department. So why shouldn't you as a CX professional have your own tools as well? Using Google sheets to create journey maps might be seen in the organisation as the finance department using a calculator to do create the yearly forecasts.
Why would I want to use Google sheets or Excel
After reading the drawbacks you might wonder why would anyone want to use Google sheets or Excel to create their journey maps, the answer is simple.
Almost everyone already has access to these tools.
The learning curve is relatively low as people are already familiar with the tool.
And Google sheets just doesn't feel as scary to managers.
Sometimes the best tool (to start with) is the one that you have at your disposal.
When should I use Google sheets or Excel
The way I see it there are basically 3 scenarios and only in one of them would I recommend Google sheets as your go to journey mapping tool. This is based on the assumption that you don't already have any other journey mapping tool in place.
Scenario 1: The workshop - use a quick and dirty tool
When you need a customer journey map for a workshop or just want to capture the results. And you don't plan to do anything with the map after the workshop then just use a quick and dirty tool. I would pick up a set of sharpies and brown paper or when it needs to be digital a tool like Miro.
Scenario 2: The project - use Google sheets
If you're in a project that runs for a few weeks and requires a journey map, Google sheets might be the tool you want to reach for. You don't have to spend a lot of time teaching your team mates how to use the tool.
You (hopefully) don't have to go through a complicated licensing process. Google sheets allows you to get up and running fast and focus most of the scares time you have in a project on the content.
Scenario 3: The strategy - use a professional tool
As soon as you start seeing customer journey maps as something that will help you to drive customer centric innovation within your organisation it's time to reach for a professional tool.
A professional tool will help you to start treating journey maps as a capital that builds up over time. The small details and nuances in professional tools allow you to work more efficiently and when you use journey maps on a day to day basis that quickly starts to add up.
Just as you don't want your don't want your journey maps to run on a spreadsheet just like you wouldn't want that for your enterprise billing system.
Get access to the Google sheets journey map template
You can get access to the journey map we've created in this article.
Just make a copy of it and start playing around.
Next step
The focus of this article was to show you how to use the tools.
The next obvious step is really to create your own journey map.
You might run into questions like: which journey should I map first, where should my journey end and how detailed should my journey map be?
If that's the case, have a look at The Perfect Map.
It will guide you step-by-step through the entire process of creating a useful journey map.


One Reply
Love this, thank you.
This is very helpful