Journey Mapping for Busy People
Published in: Journey Mapping / Last update: July 2020

I get it. You need a customer journey map, and you need one now.
Whether you're new to customer journey mapping and just want to get a quick taste for what this is all about...
Or you're a veteran with a team meeting tomorrow, and you don't want to show up empty handed...
Sometimes, you just don't have the time to go through every stage of the journey mapping process. And frankly, sometimes you don't need to.
This article will help you create a journey map in 30 minutes or less and make sure you don't skip the key steps.
Simplicity is the ultimate form of sophistication.
Ready? Let's do this!
A Journey Mapping bootcamp
Here is a bit of context to put the journey map you're going to create into perspective.
If you're really in a hurry and want to start mapping right now, just scroll down to the next section and come back here later.
To get a journey map out in half an hour, you're going to skip a lot of steps in the process. It's just going to be the bare essentials.
You're going to skip important questions like: Why am I creating this journey map (here are 5 smart reasons)? For whom am I creating it? What are we going to do with it once it's there?
Usually, my strong advice is to not skip these questions. Go slow to go fast is the best approach in most journey mapping scenarios. But hey, sometimes desperate times call for desperate measures.
So, can you even realistically create a valuable customer journey map in 30 minutes?
Or will it just be a waste of your time in the end?
To answer this, you must keep in mind that customer journey mapping should always be an ongoing activity as explained in the Practical Guide.
But there's always a starting point in this ongoing activity. Let this starting point be the map that you're going to create now.
This journey map is going to be your Shitty First Draft (SFD). And SFDs are super useful as long as you know that they're SFDs. 🙂
This SFD is going to primarily purge what's in your head already. It’s a brain dump.
We do this because it's much easier to talk about your customer journey when it's in front of you rather than hidden in your head.
Pro tip: Add the letters SFD to the title of your map, e.g., "Going through the checkout journey map (SFD)." It sparks curiosity. When people start asking questions about it, you'll get the chance to explain what it is.
Which journey mapping tool should I use?
The other question we need to answer before we start mapping is: Which tool should we use?
This question is critical because if we pick the wrong tool, we'll never be able to create a journey map in 30 minutes.
So here is my take:
If you're already using a professional journey mapping tool like Custellence, UXPressia or Smaply, go ahead and use that.
Otherwise, just stick with the trusted sticky notes. For an SFD, these are more than adequate.
Just don't go with tools like PowerPoint, InDesign or Visio, even if you have secret ninja skills.
What about using a premade journey map template?
Yes, templates can be really helpful if you're short on time.
We've discussed quite a few journey map templates in this overview.
There's just a big caveat to using templates: The template has to be really simple and contain just a few elements. If not, you'll lose yourself in the details while the clock is ticking.
So, your template will most likely be so simple that you can just as well create the structure yourself.
Step 1: Map the stages
Let’s use getting a haircut at the local barbershop as our example journey.

Photo by Guus Baggermans on Unsplash
The first thing we're going to do is create our Customer Lifecycle lane and divide our journey into 3 stages: 1) before, 2) during and 3) after the service encounter.
These 3 stages will be the uppermost lane in our map.
That's enough for now. You can always expand and elaborate later.

Start your map with the Customer Lifecycle lane
Step 2: Map the activities & situations.
Now we're going to add a second lane below the stages lane we've just created.
In this second lane, we're going to map Customer Activities & Situations. These are basically what your customer is doing in the different stages of the journey.
The first card you're going to add is the moment of interaction with your service.
In our example this could be something like: sitting in the chair and chatting with the barber.
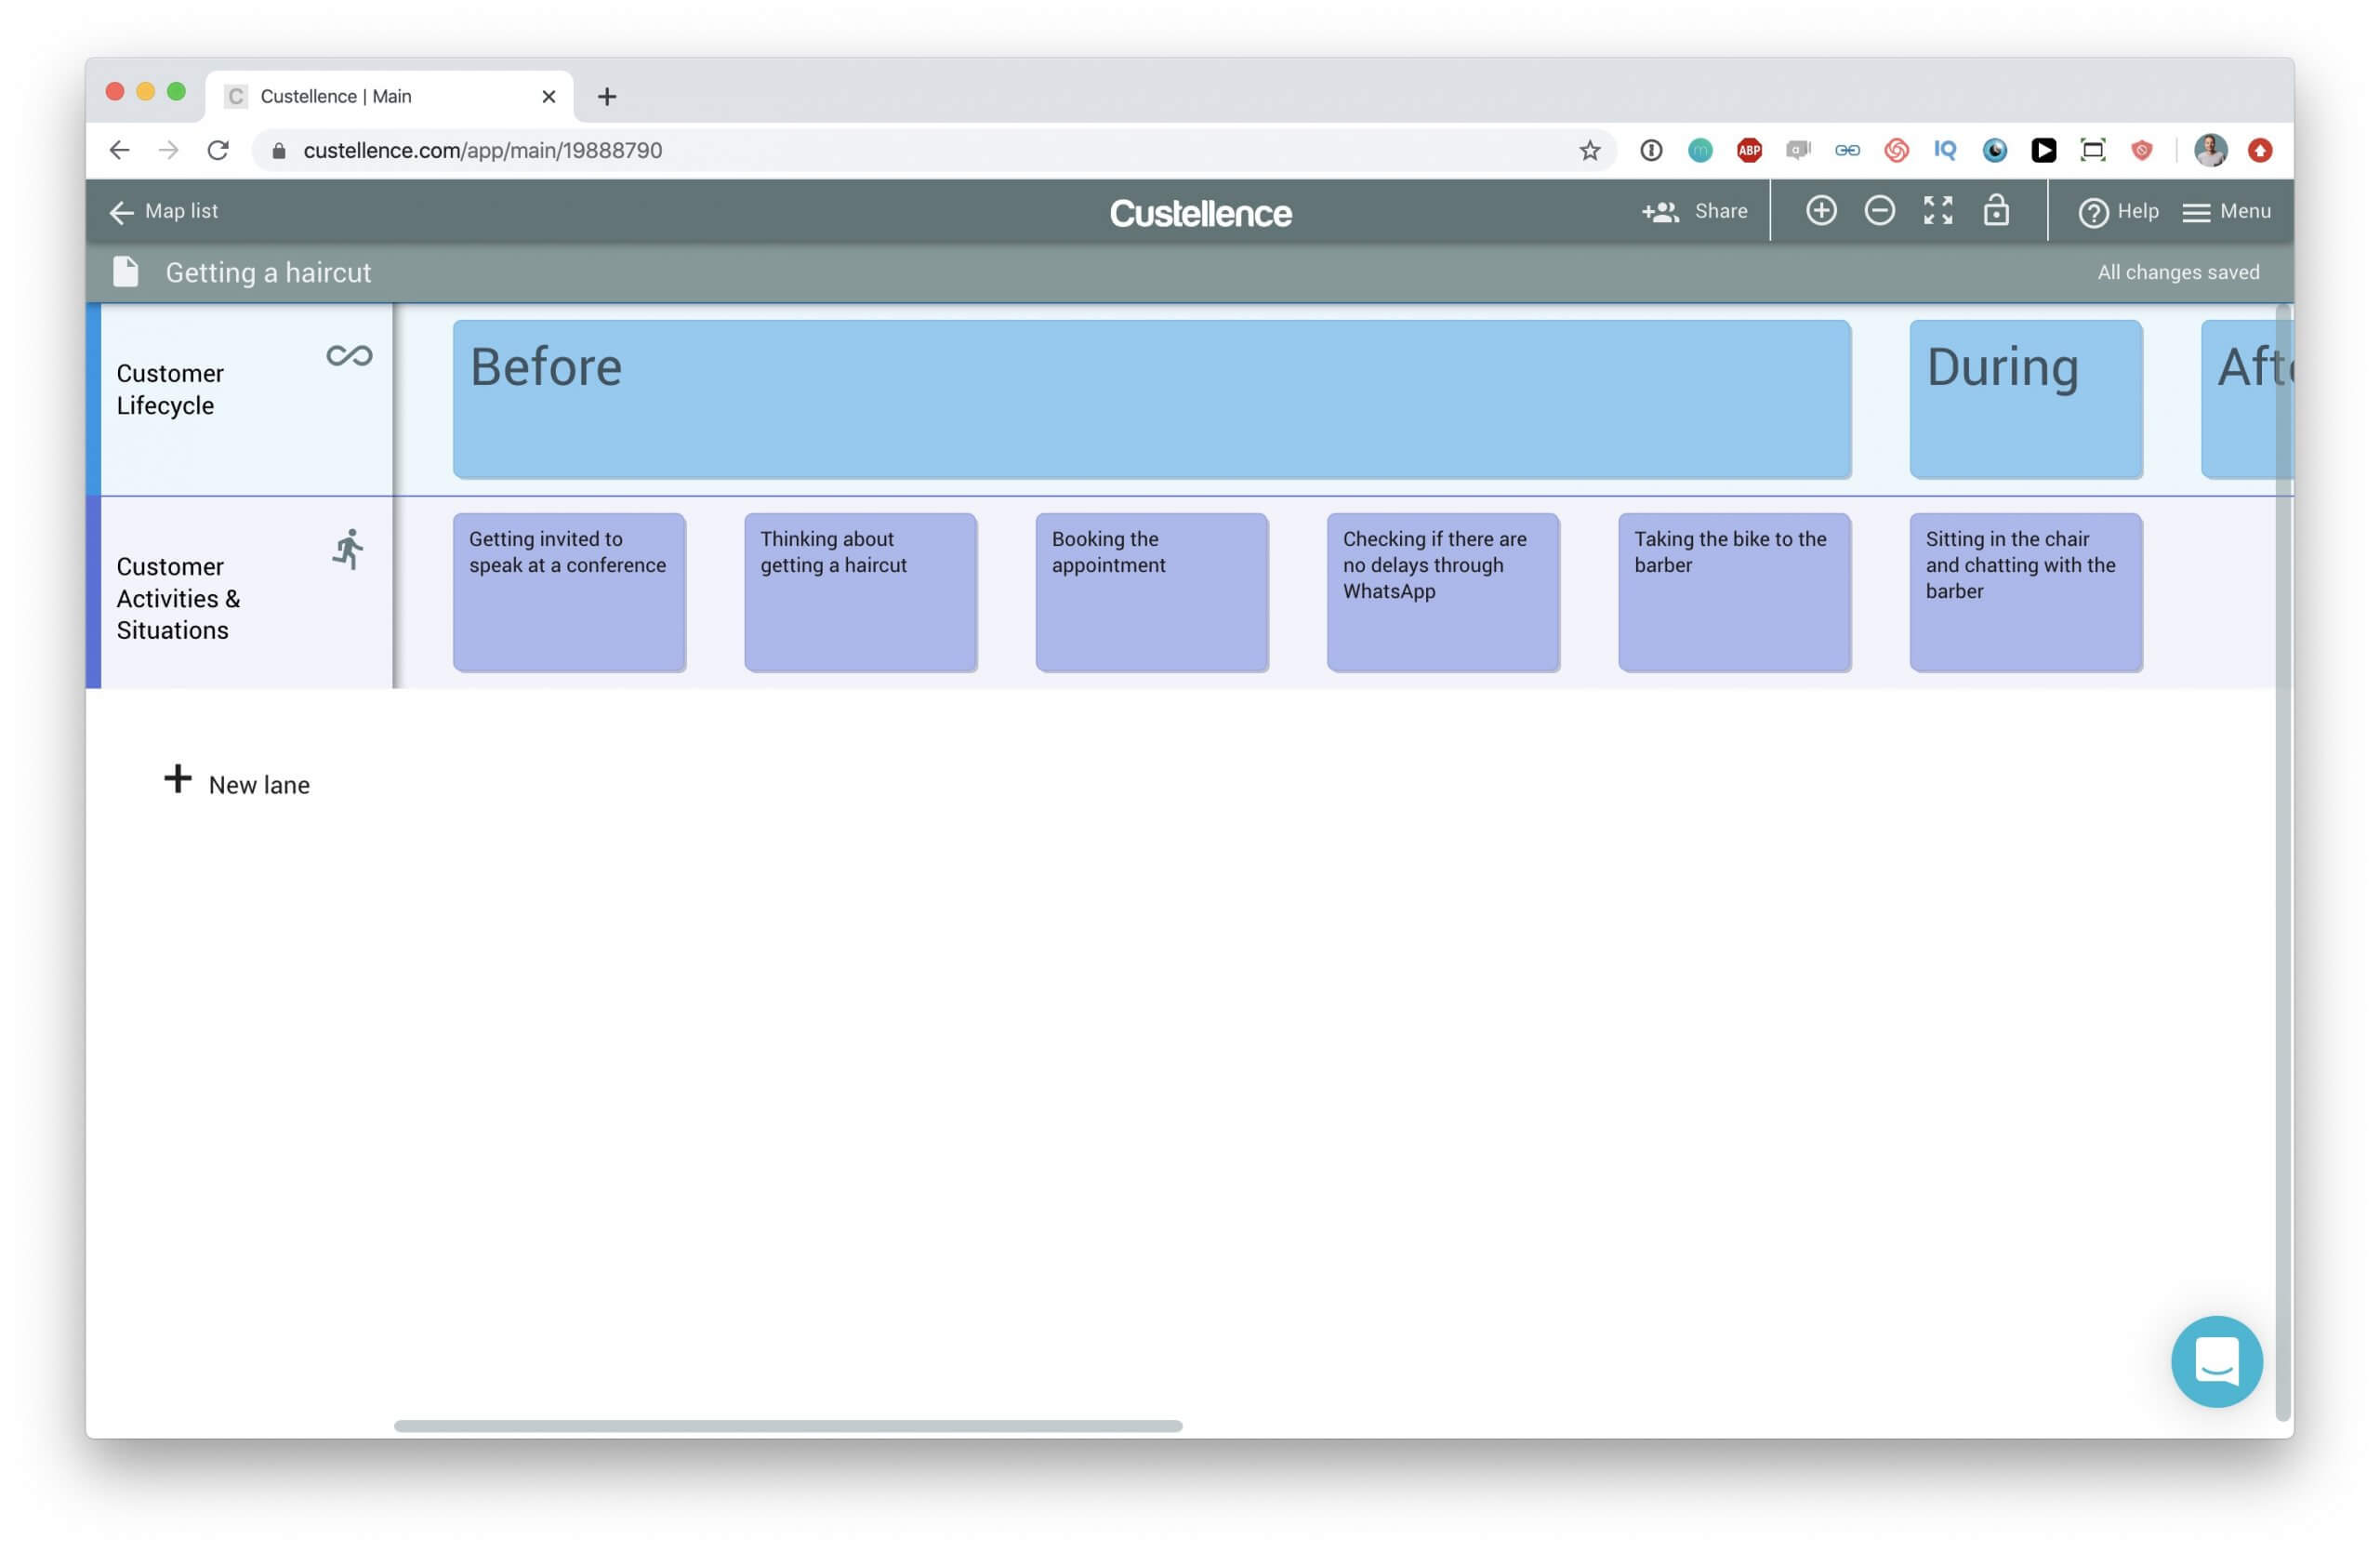
You add this card to your map below the during stage. It should be exactly in the middle of your map.

Add your first activities card below the during stage (click to enlarge)
From this first card, we're going to work our way back. We do this by naming 3–5 moments that happen before this interaction.
It could be moments like:
- Getting invited to speak at a conference
- Thinking about getting a haircut
- Booking the appointment
- Checking if there are no delays through WhatsApp
- Taking the bike to the barber
The examples above all fall into the before stage of the journey.
We could just as well define some moments in the during stage that happen before the actual haircut, for instance, waiting in the shop for the barber to be ready. But I never arrive early at my barber... 😉

About 3 to 5 cards in the before stage is enough for now
After this, we're going to repeat the process. This time, look forward in the journey and name 3–5 moments in the experience:
- Paying the bill
- Feeling the leftover hair itching
- Receiving compliments from your spouse
Naming moments that happen further on in the journey can be a bit more challenging. For now, just make sure you have at least 1 customer activity mapped in the after stage. Again, you'll be able to expand later.
Your journey map should look similar to the image below.

The completed Customer Activities and Situations lane (click to enlarge)
Pro tip: You'll get major bonus points when you create a quick drawing for each moment instead of just describing it in text.
If you're still not quite sure what you should add to this lane, take a look at A Practical Customer Journey Mapping Guide for CX Professionals, which covers this more in depth.
Step 3: Map the needs.
We're on Step 3 in the process: mapping the Customer Needs.
This should be quite straightforward, if you know the customer going through the journey well enough.
Hint: You probably don't, even if you think you do. Really, do some research.
But since I'm mapping my own journey to the barbershop in this example, I can probably say a thing or two about my needs.
In real journey mapping projects, you are never your own customer. Even if you are. Promise me you won't make this mistake.
Did you add the third layer in your map called Customer Needs? Good!
Below each customer activity, try to write down the most important need in that moment.
Write down these needs regardless of whether this need is currently fulfilled by your service or not. This is very important.
Let's go back to the barbershop, shall we?
I'm someone who highly values a personal approach during the service, but I hate inefficiencies in the process leading up to it.
So, going over the customer activities we mapped in Step 2, we could describe my needs as follows:
- I want to book this appointment in 2 minutes, on my own schedule. Even if it's 11:00 p.m. and I'm already half asleep, thinking about that upcoming conference.
- The day of the appointment, I want to know up front if there are any delays so I can plan my trip accordingly. Waiting at the barbershop isn't my favorite pastime.
- When I come through the door, I like to feel recognized as a customer. Even though they cut and shave dozens of clients (and I'm certainly not their biggest), a "Hi, Marc, good to see you back!" means a lot.
- It's nice when during the cut the barber and I can continue talking about the topics we discussed last time, rather than going over the weather or vacation plans.
As you can see, we have not described a need for every card in the customer activity lane. That's okay for now.
Our goal here is to capture the needs that stand out and are typical for me as a customer.
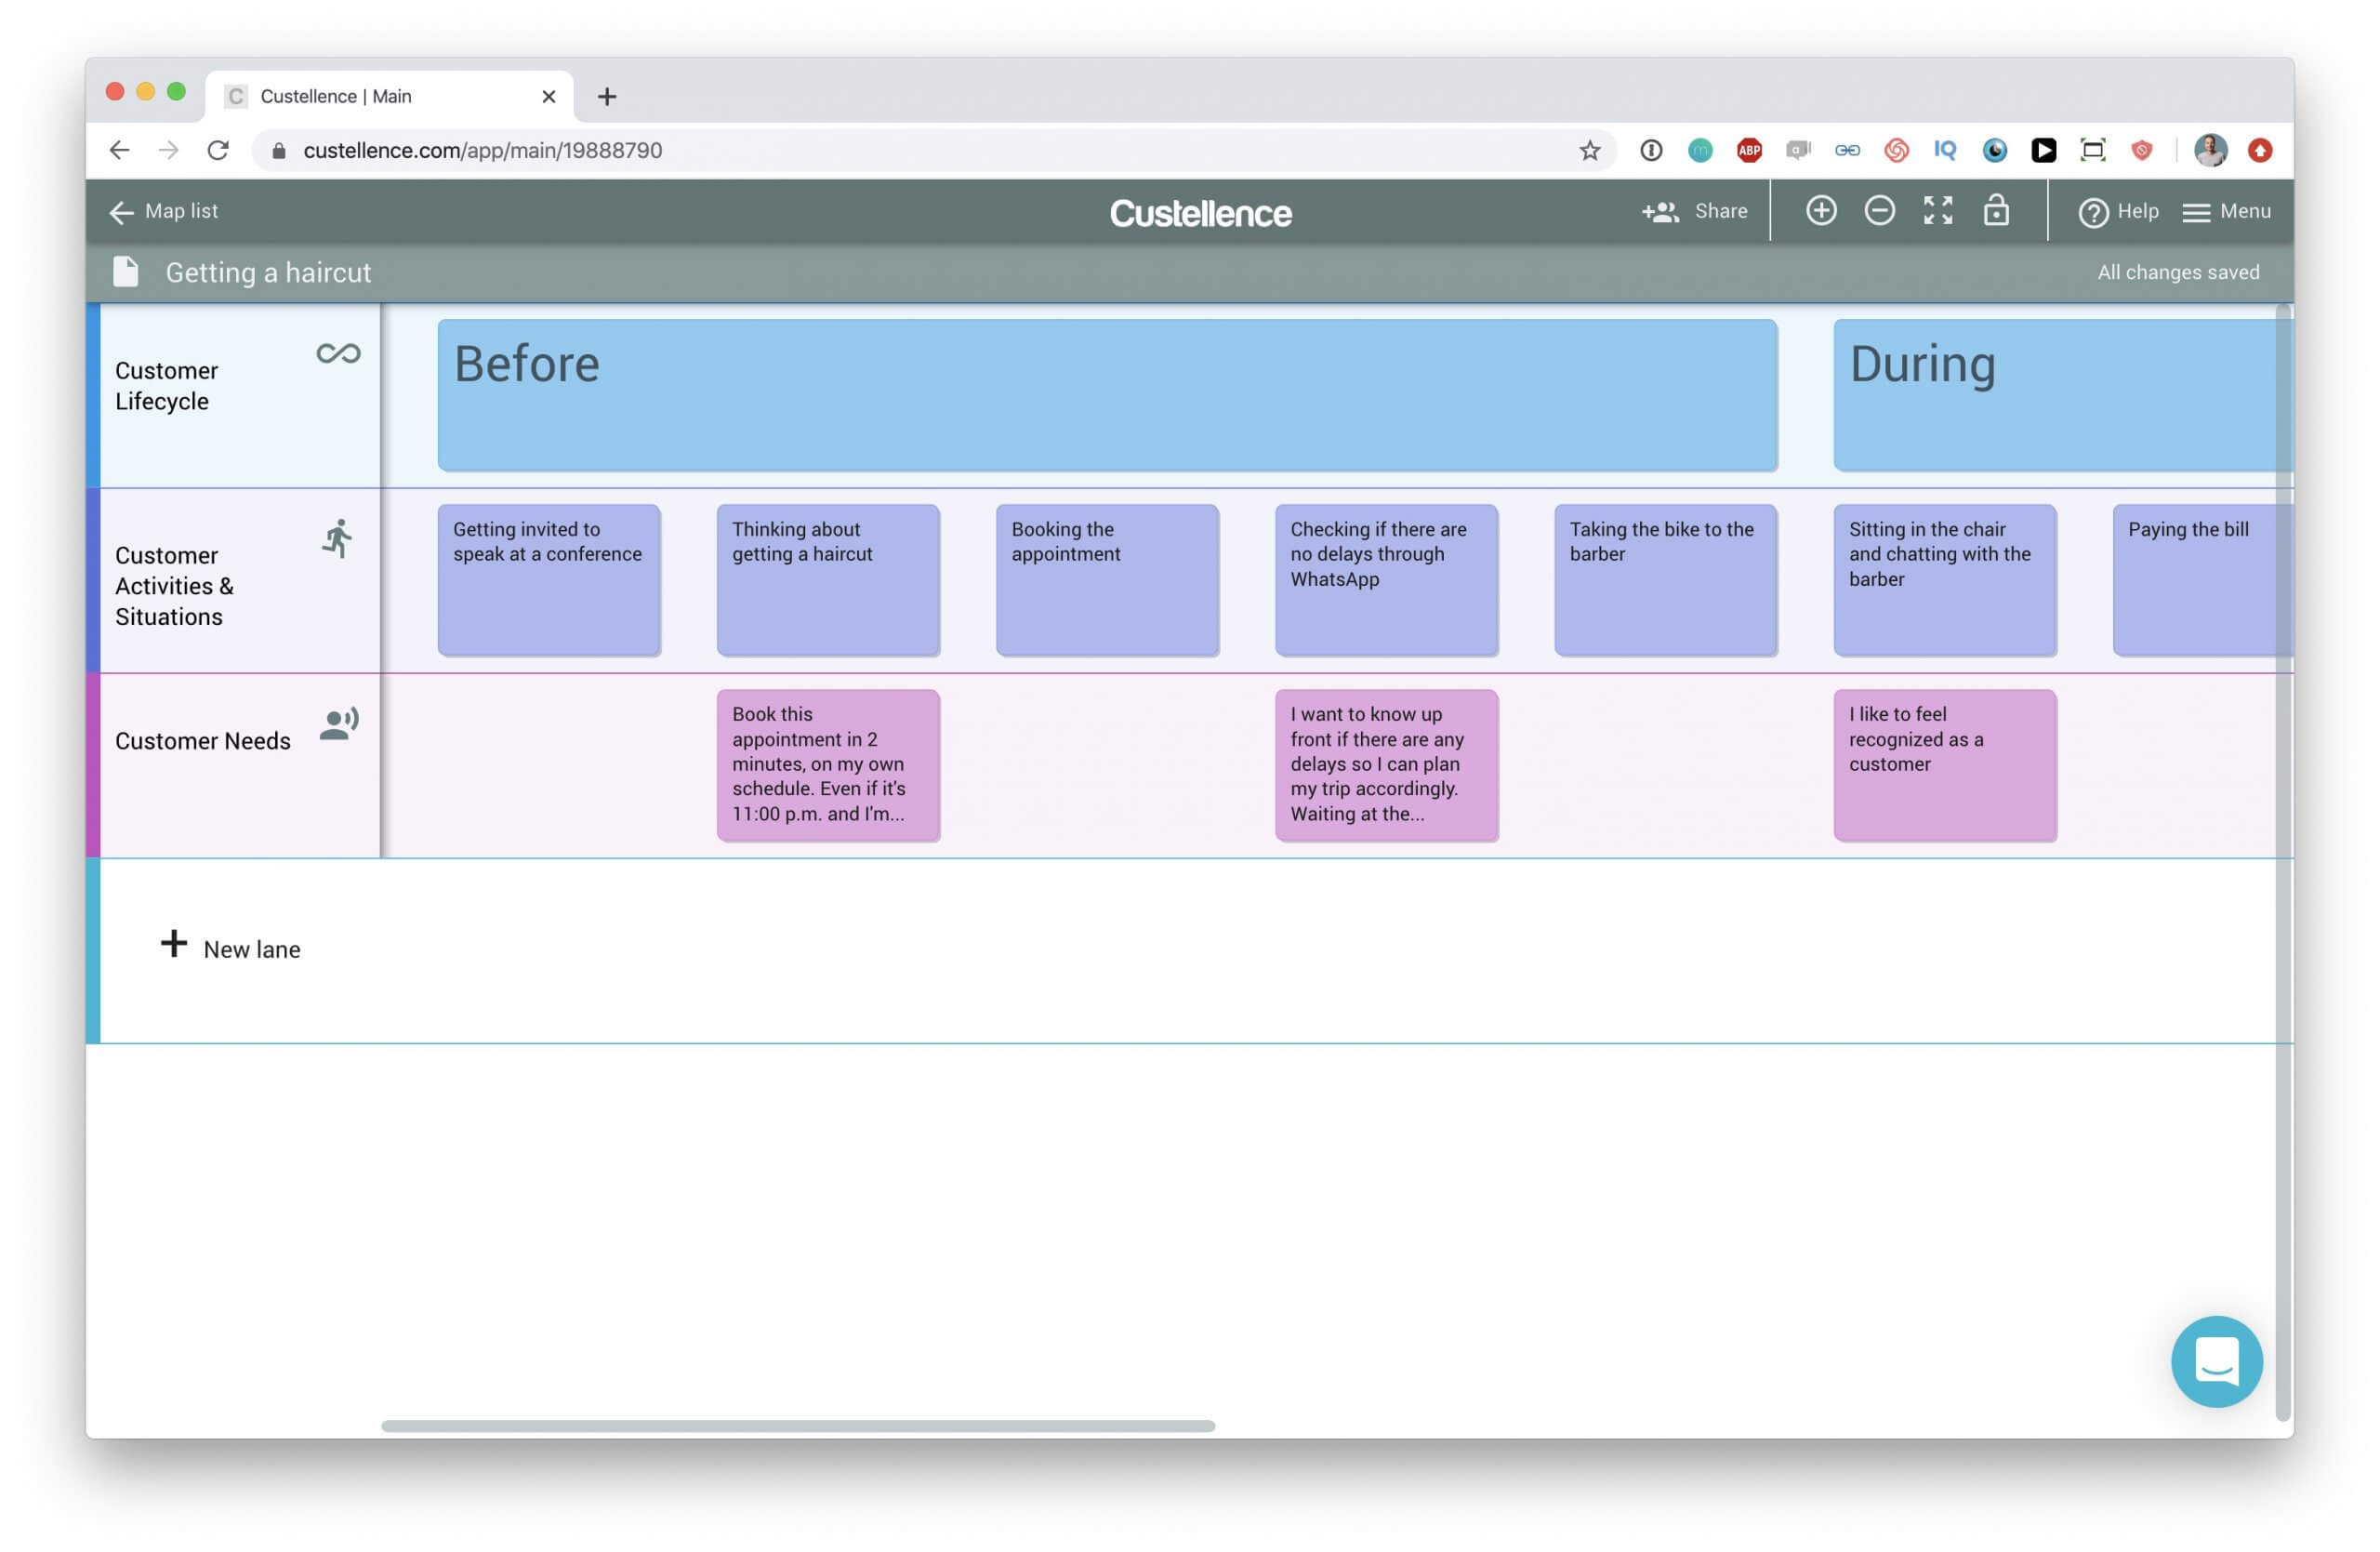
At this point, our journey map looks like the image below.

Mapping the customer needs onto activities and situations (click to enlarge)
You might be thinking: But how can I describe the customer needs in the stage when I haven't done the research? Excellent point. Thanks for bringing this up!
The answer is simple.
When we have 30 minutes to create a journey map, we're going to make a lot of assumptions based on our prior experience.
My tip here is to be very explicit about the assumptions you make.
Pro tip: You could add scores ranging from 1–10 to each customer need card, defining how strongly this customer need is based on research.
A score of 1 means that it's a total assumption. A 10 means that you have a big stack of customer interviews that support this need.
If you want to learn more about how to define good customer needs, head over to the Practical Guide.
Step 4: Map the experience.
The final lane of information we're going to add is Customer Experience.
This customer experience layer is the iconic curved line that you (should) see in every journey map.
In this lane we're going to map how satisfied or unsatisfied the customer is at each moment in the journey.
This is going to be sort of a benchmark on how well our service is performing in terms of fulfilling the needs of our customer.
Let's go over each moment in the Customer Activities & Situations lane and think about the actual service we are providing.
How does our service at that specific moment stack up to the customer needs we've identified in the previous step?
If we think that we're doing a good job of satisfying the needs, we add a point high on the curved line. If we think we’re failing to do so, it's a low point on the line.
Do this for at least 3–5 moments in the journey. Try to pick the moments that are most important to your customer.
Finally, mark as neutral those moments for which we haven't yet described a customer need.
How will we know if we're doing a good job? For now, we'll have to make assumptions again.
Once we move to version 2.0 of this SFD, we're going to back up our claims with some proper user research.
Going over the needs in our visit to the barbershop, these would be some of the highlights regarding the customer experience:
- This barber allows me to book the appointment through an online system. I'm happy.
- They send a reminder and updates through WhatsApp on the day of the appointment. This reduces the risk that I'll be waiting in the shop.
- The barber greets me by name and recalls our previous chat. I’m not sure how he remembers since I only visit once every 4–6 weeks. Maybe he keeps a secret diary.
These are all moments where I'm really satisfied with the service. And to be honest, for me, there's not a single moment in this journey where I'm truly unsatisfied.
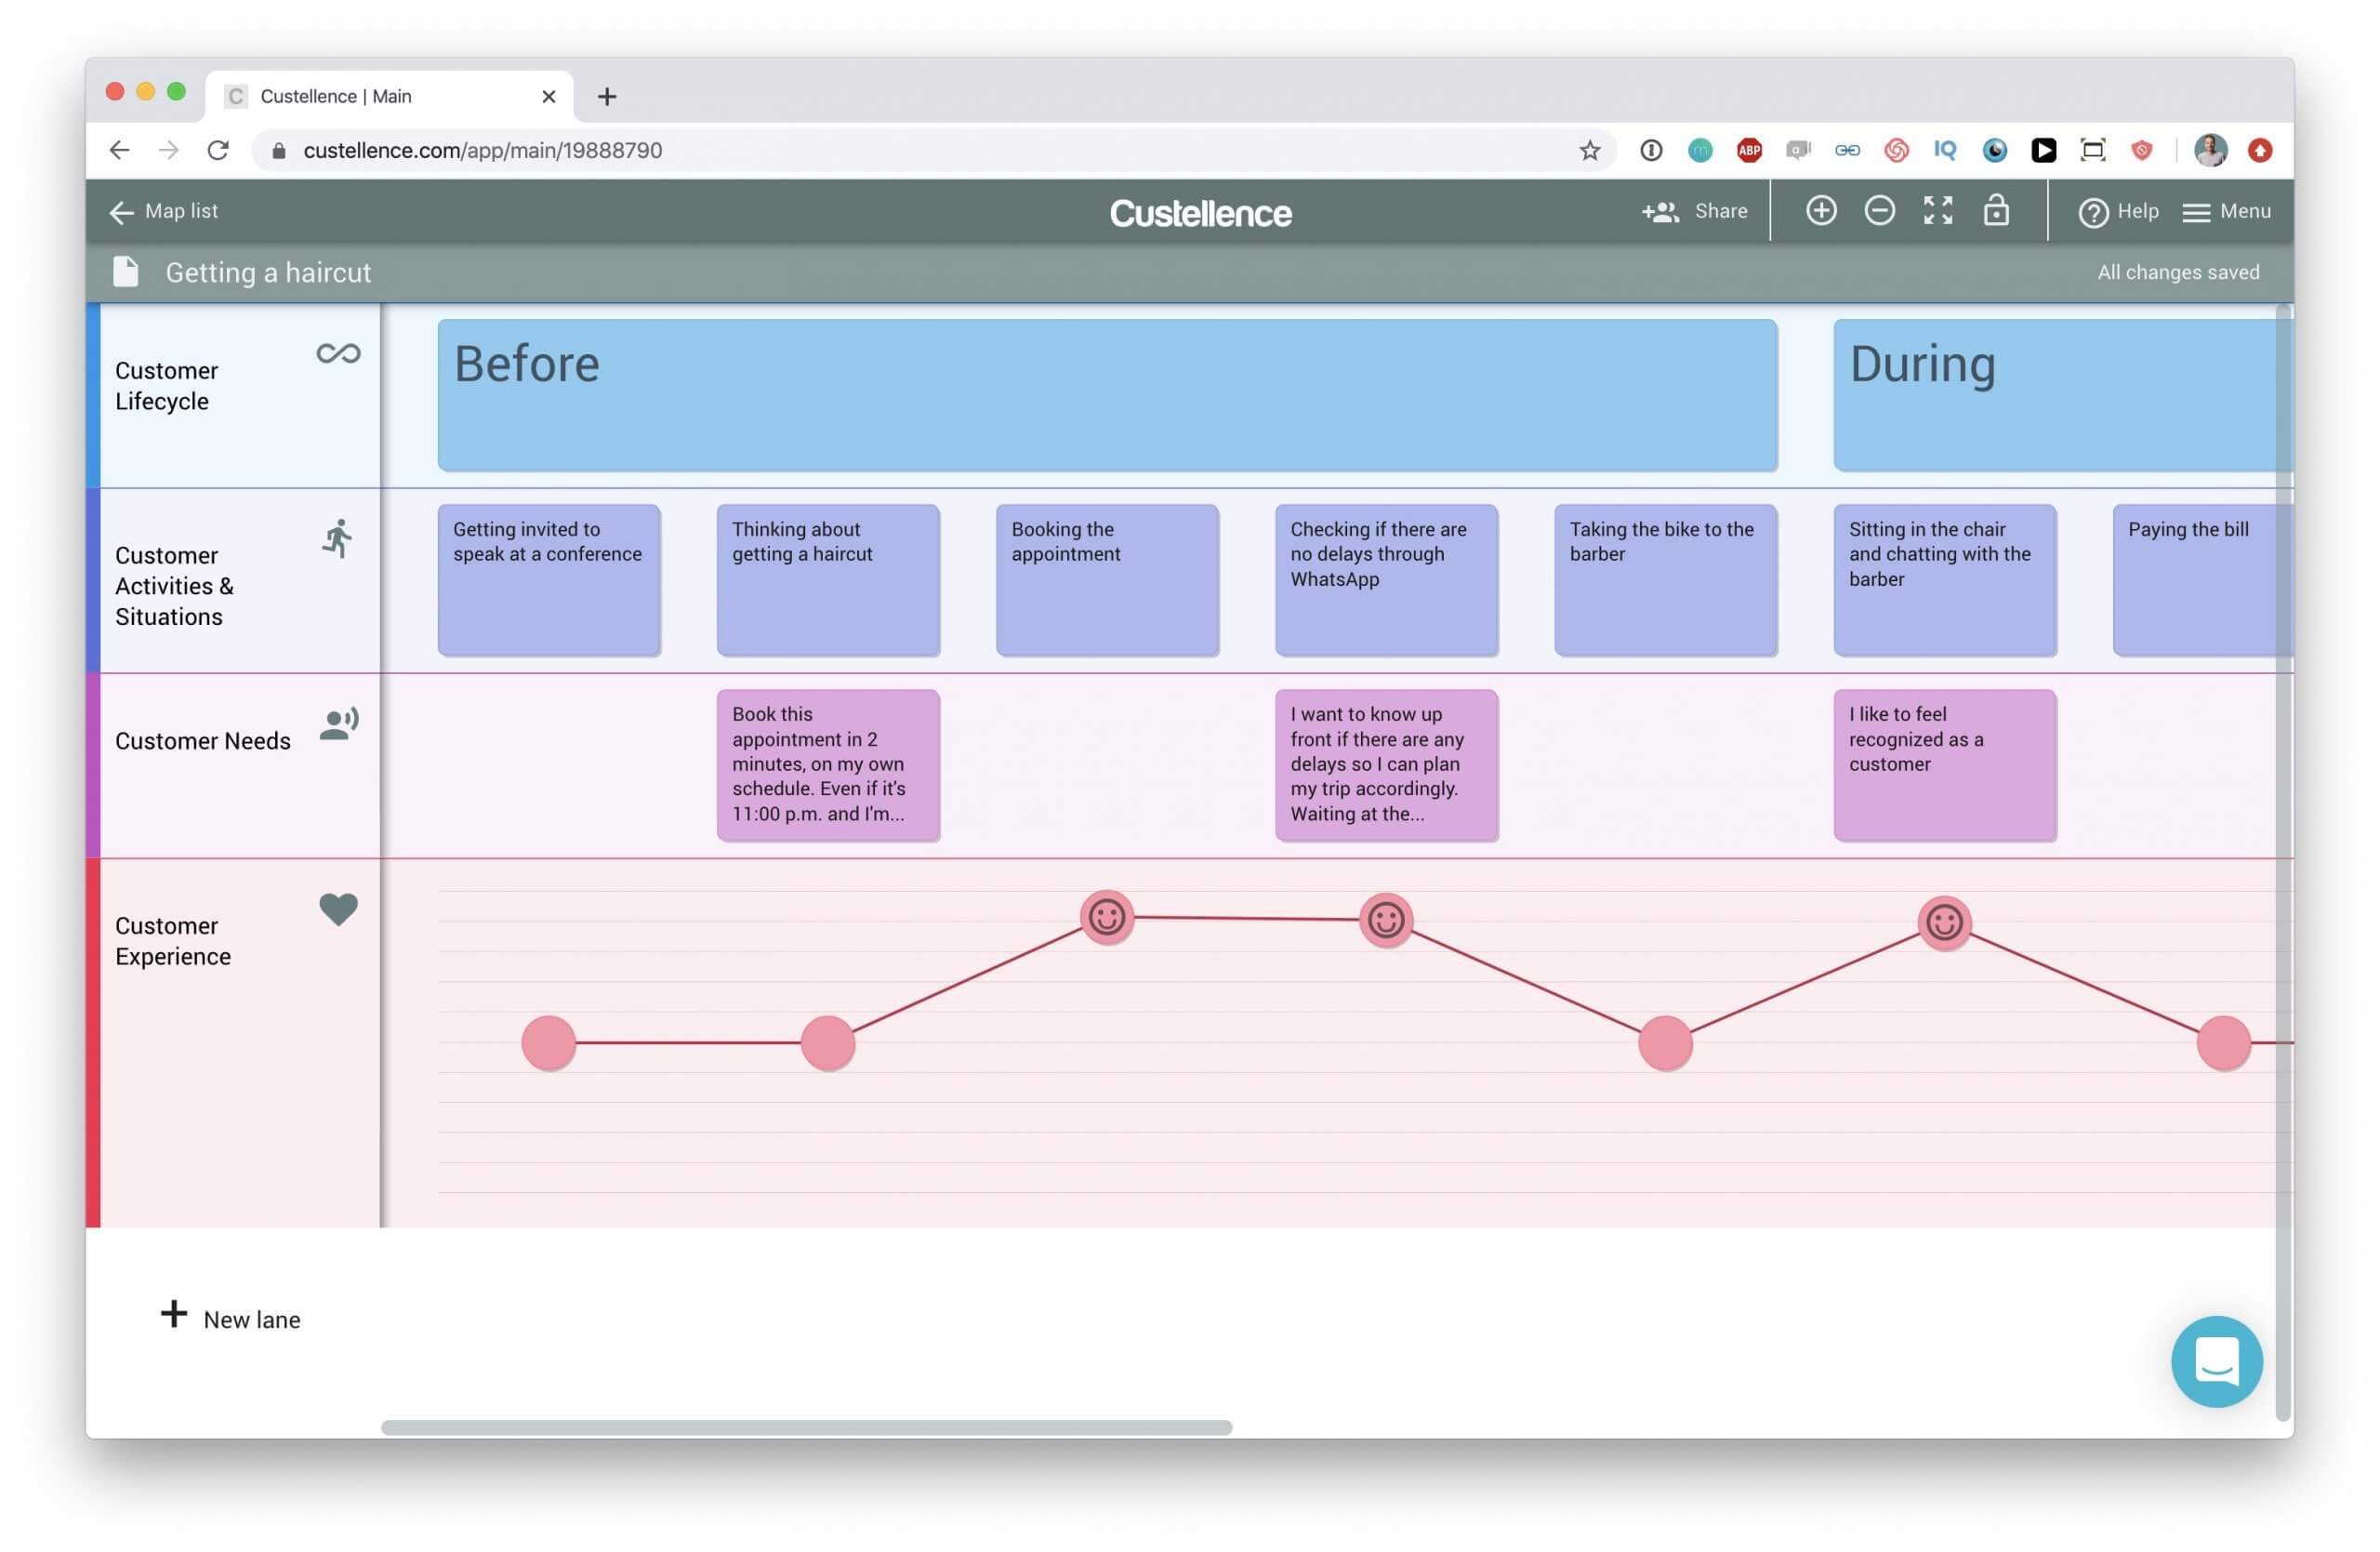
So, our Customer Experience lane looks something like this now:

The Customer Experience is visualised as a curved lane in the journey map (click to enlarge)
Now comes the final and critical step in our journey mapping process.
We need to go over the moments where we've highlighted the customer experience with either a very satisfied or unsatisfied customer.
Now describe why our customer is satisfied or unsatisfied at that specific moment.
To find the answer to this question, we must go back to the Customer Needs.
In the barbershop example, booking the appointment online caters to my need for efficiency, as do the reminders through WhatsApp.
Hearing my name the moment I walk through the door makes me feel at home and plays on the personal touch that I value.
When we fail to describe the reason why our customer is satisfied or unsatisfied, our Customer Experience lane will just be a pretty curved line without much business value.
Again, we've skipped a lot of steps. But this is one step you can't do without.
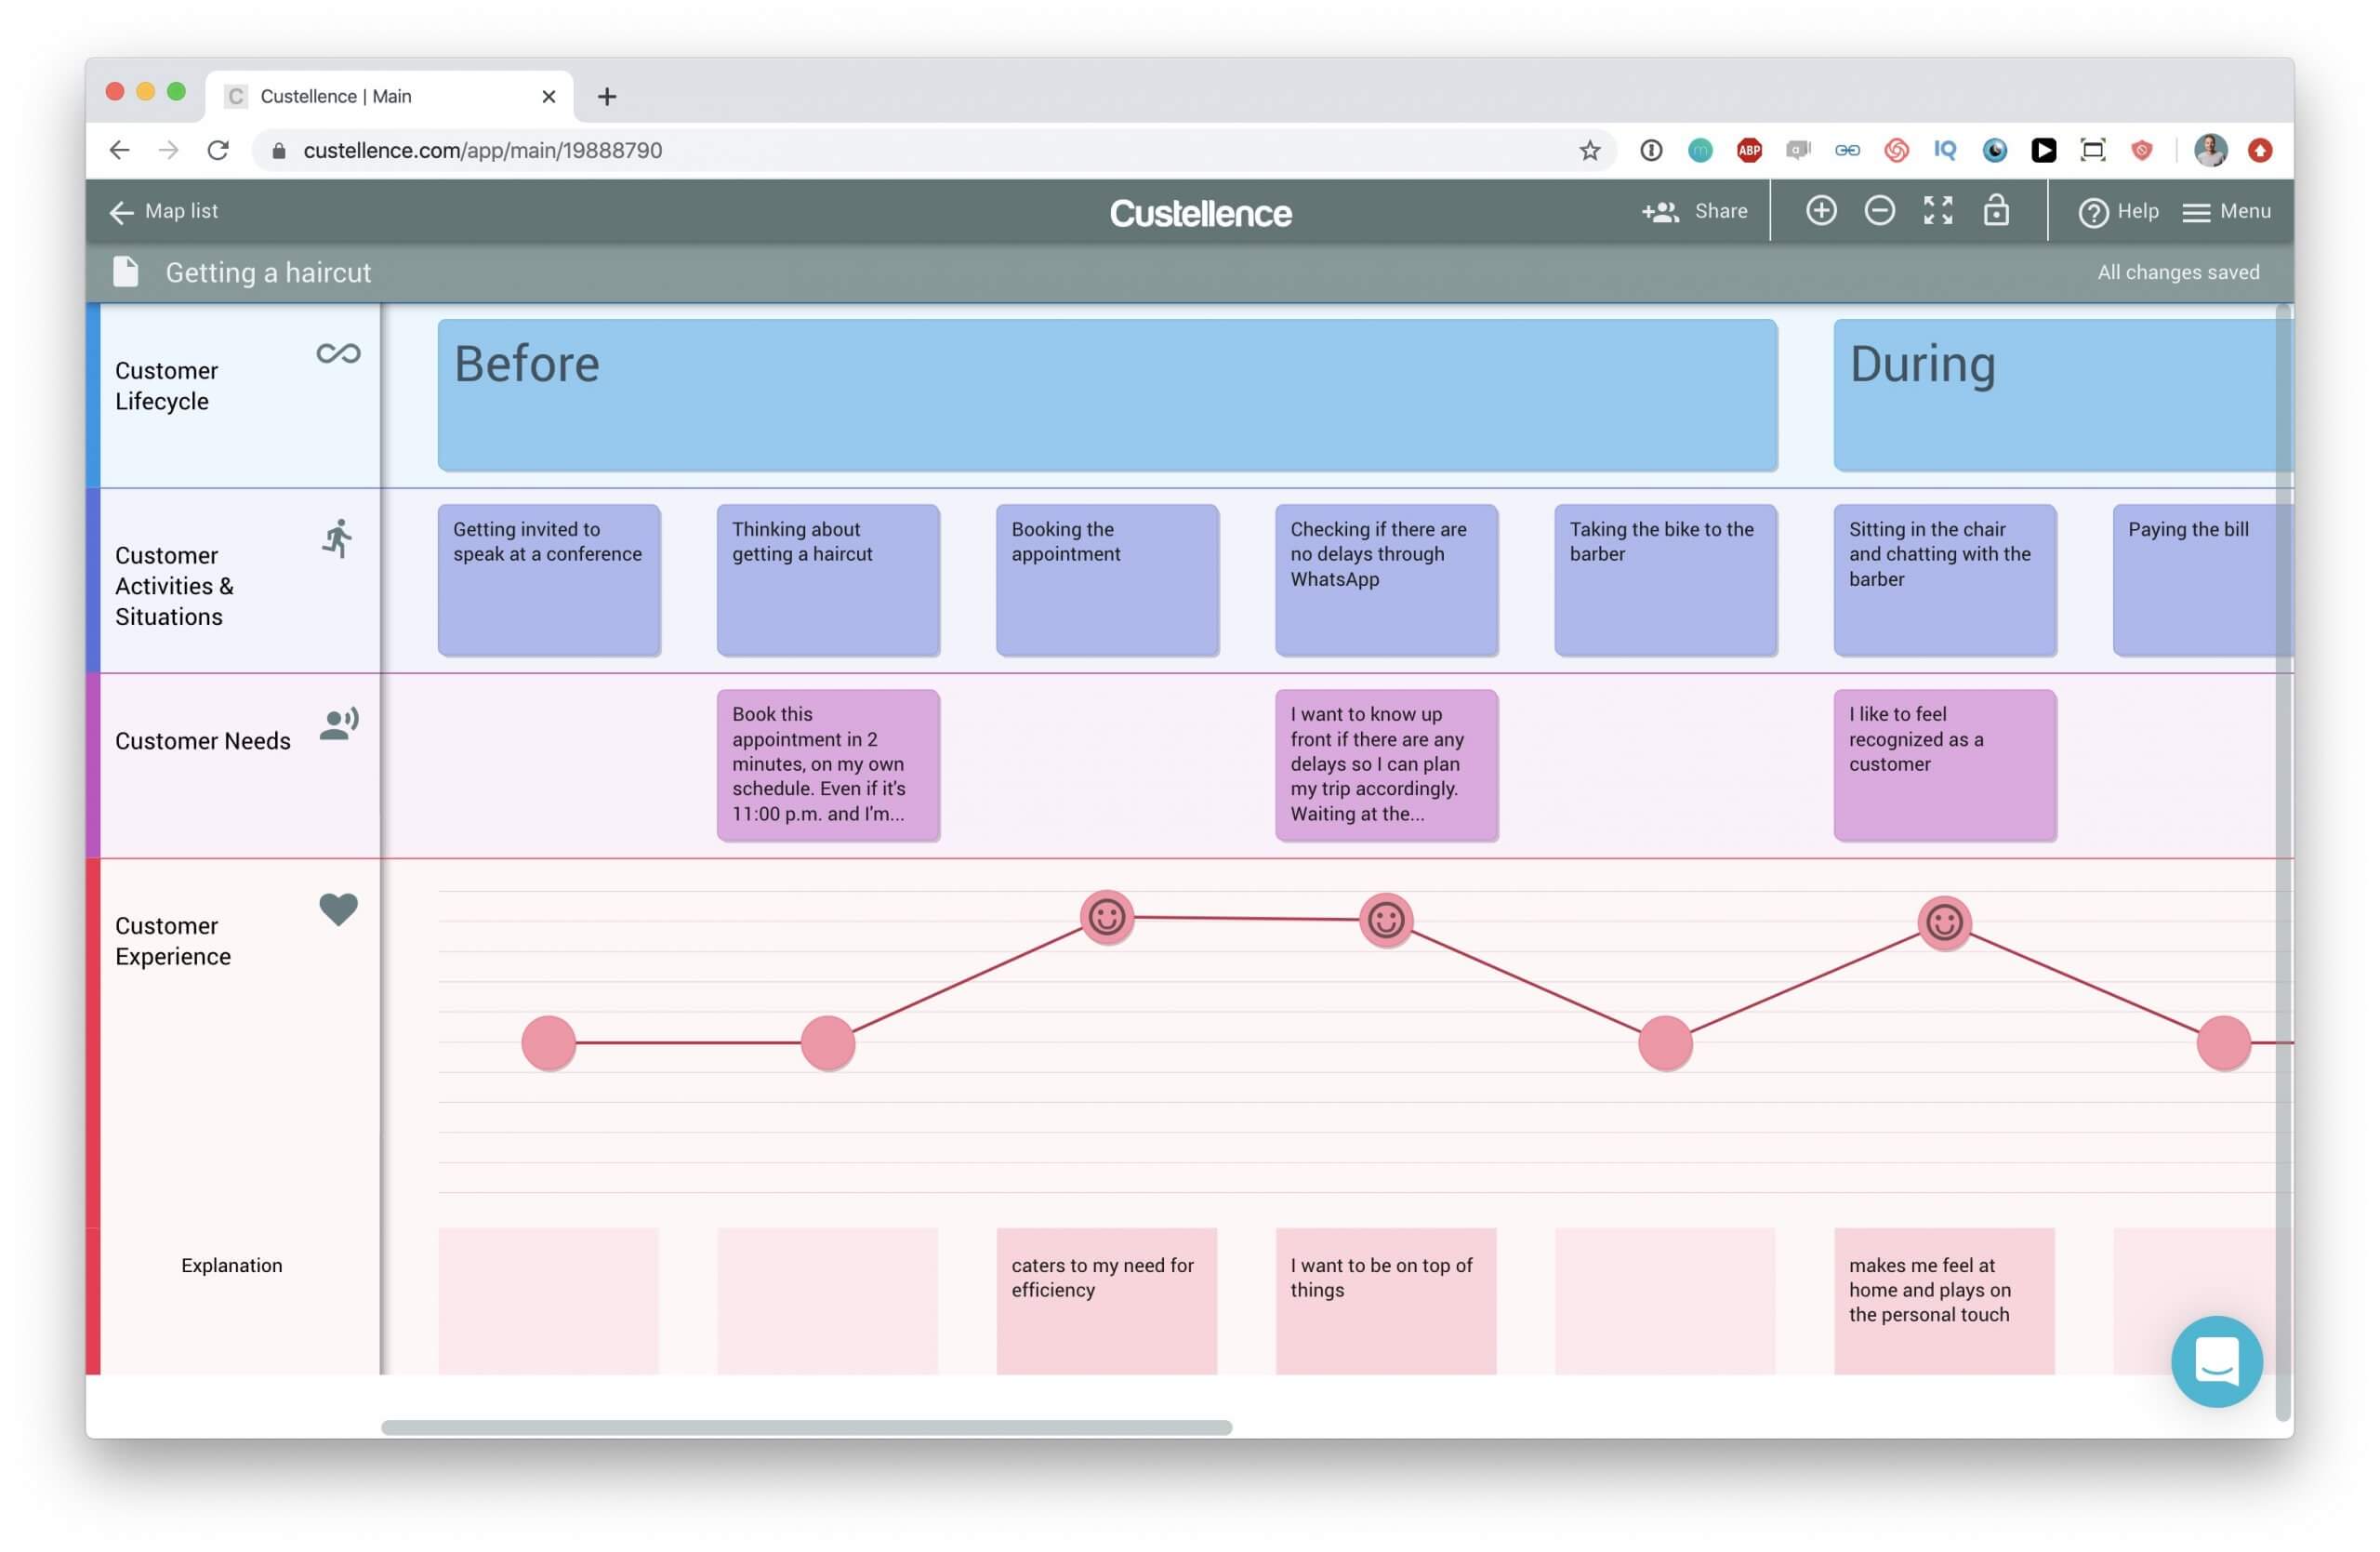
Our final customer journey map now looks like this:

Every journey map should have these fundamental elements
3, 2...1, stop the ⏰!!
What can I do with this journey map?
Congratulations on making it this far! You've just taken a very important step in your journey mapping journey.
Now comes the big question: What can you do with a journey map that you've created in 30 minutes (or less)?
You've actually got a few good options:
- Use the journey map as a conversation tool to gather input and get feedback from the people around you.
- It's a great way to check your assumptions and see if there's already some internal research data available on this journey.
- Connect the customer journey to your business. Start adding the internal systems and processes to the journey map in a backstage lane.
- Use the map as a starting point to get stakeholders thinking about the needs of customers rather than internal processes.
I'm sure that you'll find other useful applications for your SFD.
It was Dennis Boyle (employee #4 at IDEO) who said: "Never go to a meeting without a prototype."
So, remember that it's always better to bring a shitty first draft to your next meeting than just some ideas.
Do I need to create a persona or customer profile first?
Creating an "anonymous" journey map is one of the most common journey mapping mistakes.
And when you think about it, you can't have a customer journey without a customer.
In our journey mapping process, we didn’t have the time to create a customer profile, persona, or empathy map.
But we of course had a customer in mind the whole time. We couldn't have described the customer needs otherwise, right?
These customer needs already paint a picture of this customer, albeit a very crude one.
Deeply understanding the customer who is going through the journey is a key factor in getting value out of your map.
We only skipped this step due to our very strict time constraints.
So, now that we're done with our SFD, spend another 15 minutes to describe your customer in a basic empathy map.

Miro.com is a nice tool to quickly create an Empathy Map
Just like with our journey map, the goal with this empathy map is not to be complete.
The goal is to get our assumptions about who the customer is out of our heads and onto paper so that we can have a more structured conversation.
Creating Assumption-based Journey Maps
I'd argue that user research is the most important thing in the journey mapping process (and I'm not the only one as you'll see in the video below).
And still, we've created a journey map based on assumptions. What's going on?
Assumption-based maps can actually be very useful in order to get resources for user research.
Imagine that you have to explain to your manager that you want to conduct some interviews or do a field study before creating the journey map.
You know that even if you think you know who your customers are and what they need, you probably don't. Even if you've been with the company for 10 years.
Your manager, on the other hand, might feel that there's already enough knowledge within the organization.
But you want to literally point to the customer journey and start asking questions like: Do we really know what happens in this part? How confident are we about how the customer feels at this moment?
With a tangible map, it becomes much easier to agree on the current blind spots and make your case to invest in some proper user research.
When creating an assumption-based journey map, you just have to be very mindful about the assumptions you make.
Pro tip: Make your assumptions explicit by assigning a confidence score to each card in the map.
And don't forget that user research isn't just a way to validate your assumptions. It's also a way to explore and discover customer needs that you didn't see before.
Check out this video to learn more about how much research you need to create meaningful journey maps.
Recommended Next Steps
Congratulations! You've just taken a very important step toward putting customers at the heart of your organization.
What's next? Start using the map!
Share it with people. Get feedback. Have discussions about the contents.
As you start having these conversations, you'll see that there's still much to explore and improve.
You'll run into questions like:
Which journey should I map first? And which customer should I pick? Where does the journey start and end?
These are questions that you'll need to answer in order to take your journey maps to the next level.
Check out the Customer Journey Mapping Essentials Masterclass, which will get you up to speed on these questions in no time.